
Getting started on a computer: iBudgetAll in your browser
This guide takes you from the sign-in page to a budget you manage on a big screen, in five steps. If you're new to the envelope method, start with our guide “Getting started with iBudgetAll”: it explains the method and the preparation, and everything it says also applies on a computer.
The desktop version on video
Prefer watching to reading? The video guide covers everything in ten chapters, from the envelope method to your forecasts: go straight to the chapter you need.
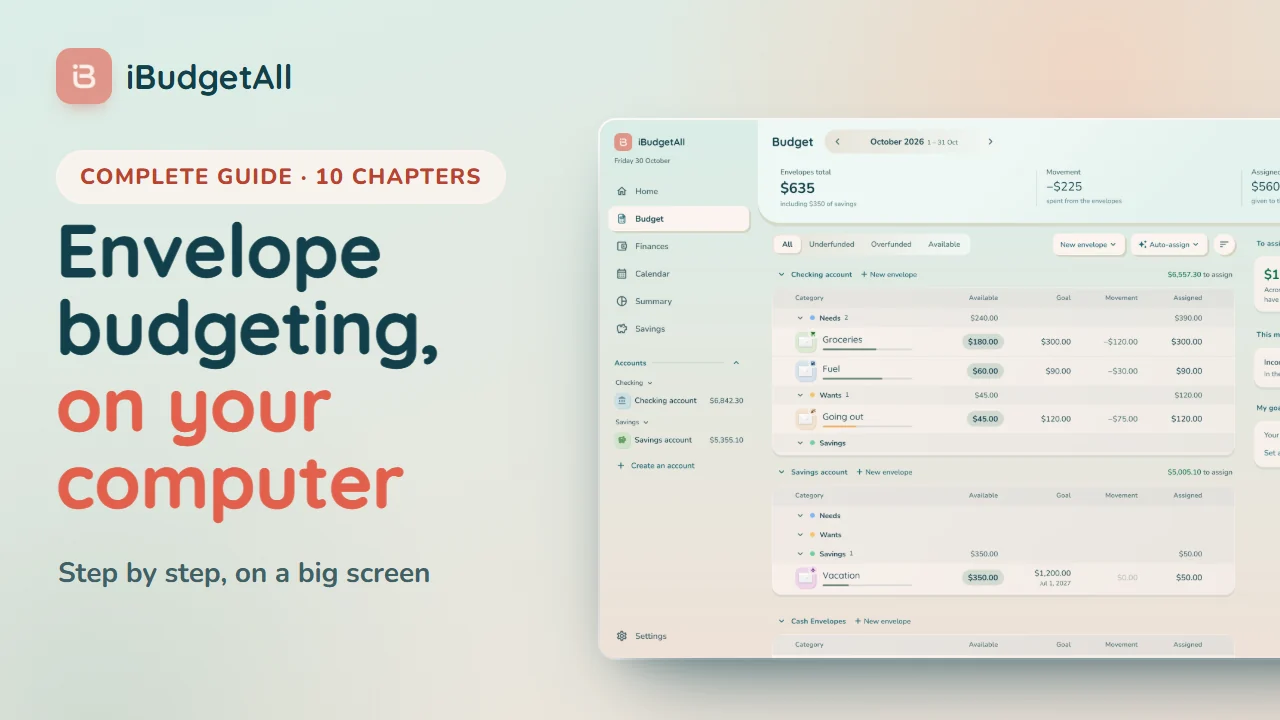
Video hosted by YouTube. It loads only when you click: until you start it, nothing is sent to YouTube. Open on YouTube.
The 10 chapters
- 0:00The envelope method
- 0:45Getting started: install, sign in, set up
- 1:40Finding your way on a computer
- 2:29Per account or global budget?
- 3:01Finances: income and fixed expenses
- 3:45Creating your envelopes
- 4:34Assigning your money
- 5:17Day to day: spending
- 6:00Validating your transactions
- 6:44Reading your forecasts
Plan for about ten minutes for a new account, and no time at all if you already use the app on your phone: your budget opens just as you left it.
Before you start
What the desktop version is. It's the iBudgetAll app, opened in your browser at app.arjbstudio.fr. There's no file to download: to have it as an app, with its own icon and window, install it from your browser (next section).
Same account, same data. Sign in with the account you use on your phone: you'll find your accounts, your envelopes, your recurring rules and your settings. What you enter on one device shows up on the other.
A wide enough window. The desktop version is shown when the window is at least 900 pixels wide. Below that, for example in a small window, the app uses the phone layout. Widen the window to get the sidebar and the columns back.
What's different from the phone:
| On a computer | On a phone | |
|---|---|---|
| Installation | Optional, from the browser, with no file to download | From the App Store or Google Play |
| Navigation | The sidebar on the left: “Home”, “Budget”, “Finances”, “Calendar”, “Summary”, “Savings”, your accounts, “Settings” | The tabs at the bottom of the screen |
| Data entry | In a window in the middle of the page, without leaving it; a row's actions appear when you hover over it with the mouse | In a sheet that slides up from the bottom |
| Subscription | No purchases: “My subscription” sends you to the mobile app | You subscribe in the app |
| Notifications | Reminders in the browser, if you allow them | Depending on your settings |
| Security code | Not available: the browser has no code lock | Available in “Settings” |
| Statistics | In “Home”, “My figures” section | Their own page |
Install the app on your computer
You don't have to install the app: it works just as well in a tab. Installing it gives it its own icon, like your other apps (Start menu, Dock or Launchpad), and its own window, without an address bar or tabs. There's no file to download: your browser installs it in a few seconds.
In Chrome or Edge, on Windows or on a Mac. Open app.arjbstudio.fr. On the right side of the address bar, click the install icon. In Chrome, an install window opens: go on to the next step, then click “Install”. On Windows, the app is added to the Start menu and, if you leave the desktop shortcut box checked, to the desktop. In Edge, follow the steps shown in the same way.
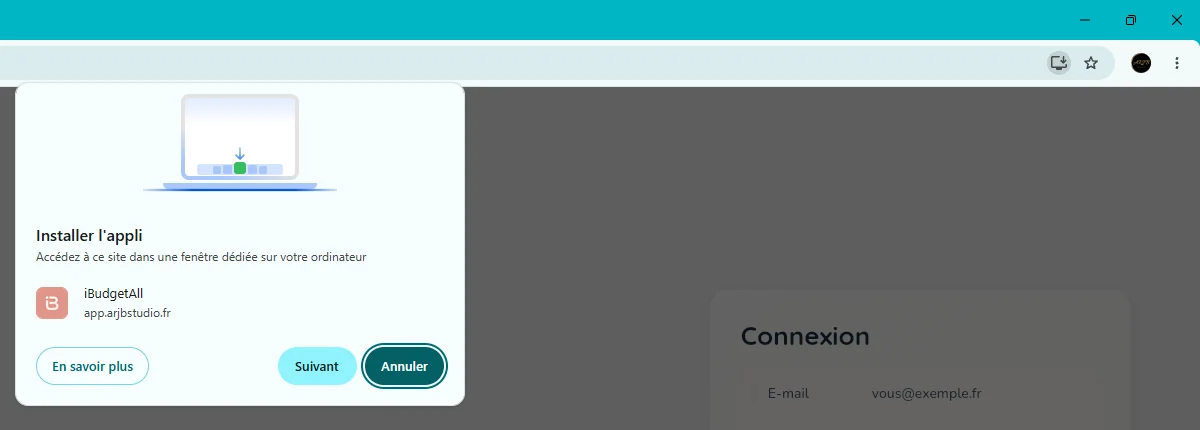
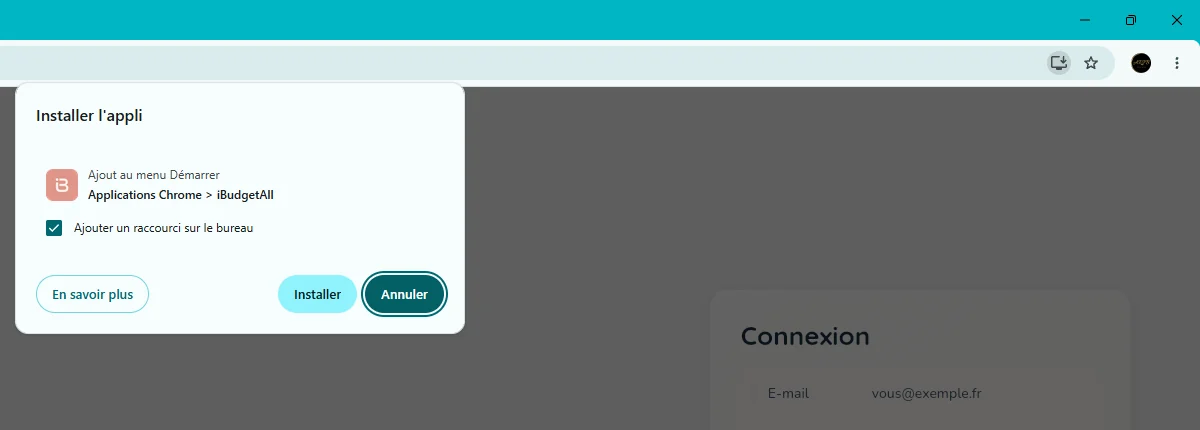
If the icon doesn't appear, use the browser's menu, the three dots at the top right: in Chrome, the install option is under “Cast, save, and share”; in Edge, under apps.
In Safari, on a Mac. Open app.arjbstudio.fr, then, in the menu bar, choose “File”, “Add to Dock”. Check the name and click “Add”. You need macOS Sonoma (version 14) or later.
In Firefox. On Windows, Firefox (version 143 or later) can pin the site to the taskbar with a button in the address bar. On a Mac, Firefox doesn't install apps: keep the tab, or use Safari, Chrome or Edge.
The installed app opens from its icon, like your other apps. It updates on its own: it's the same app as in the browser. If it asks you to sign in, use the same account as on your phone.
To remove it: in Chrome, open the app, ⋮ menu, “Uninstall iBudgetAll”; in Edge, on the edge://apps page, “Details”, then “Uninstall”; with Safari, drag the app from the Applications folder in your home folder to the Trash. Your data doesn't go anywhere: it stays in your account.
Sign in
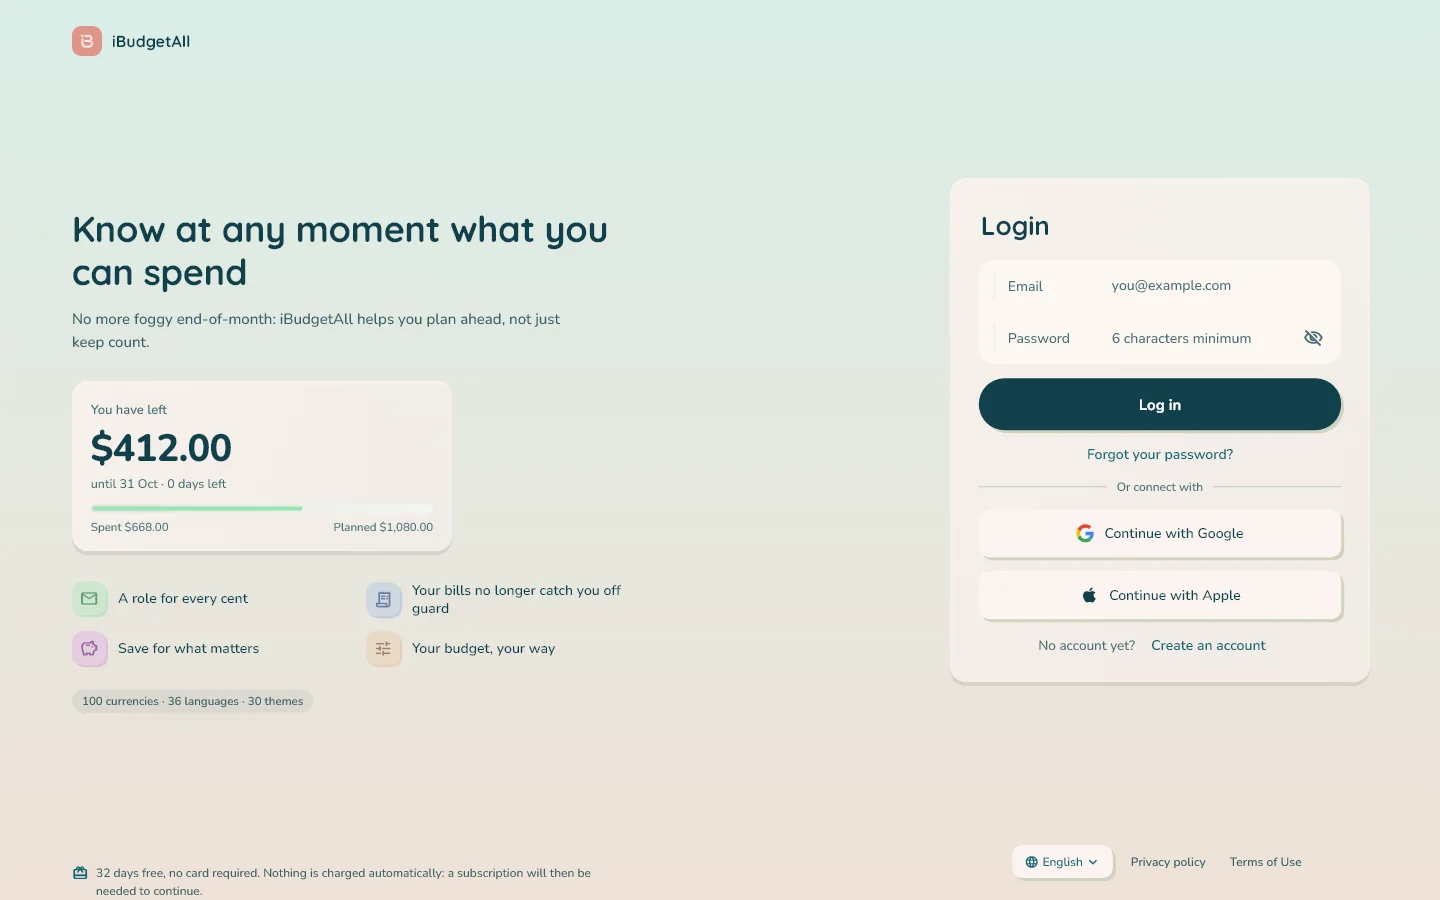
Open app.arjbstudio.fr. The sign-in page has two panels.
On the left, what the app does: “Know at any moment what you can spend”, and a mention of the 32-day trial.
On the right, the “Login” card:
- “Email” and “Password”, then “Log in”;
- “Forgot your password?” if needed;
- “Continue with Google” or “Continue with Apple”.
Sign in the same way as on your phone: with Google if you signed in there with Google, with Apple if you chose Apple, otherwise with your email. It's the surest way to get back to the same account.
No account yet? “Create an account”, below the card, opens a sign-up window.
At the bottom of the page: the app's language, the “Privacy policy” and the “Terms of Use”.
The “Audience measurement” card. On your first visit, a card appears at the bottom left. It asks whether we may measure traffic and errors in the web app with Google Analytics, which places cookies in this browser. Choose “Decline” or “Accept”: nothing is measured before you choose.
You can change your mind at any time, in “Settings”, “About” section, “Audience measurement” row. Your choice applies to this browser.
Set up a new account
Already using iBudgetAll on your phone? Skip to step 4: your budget opens right away.
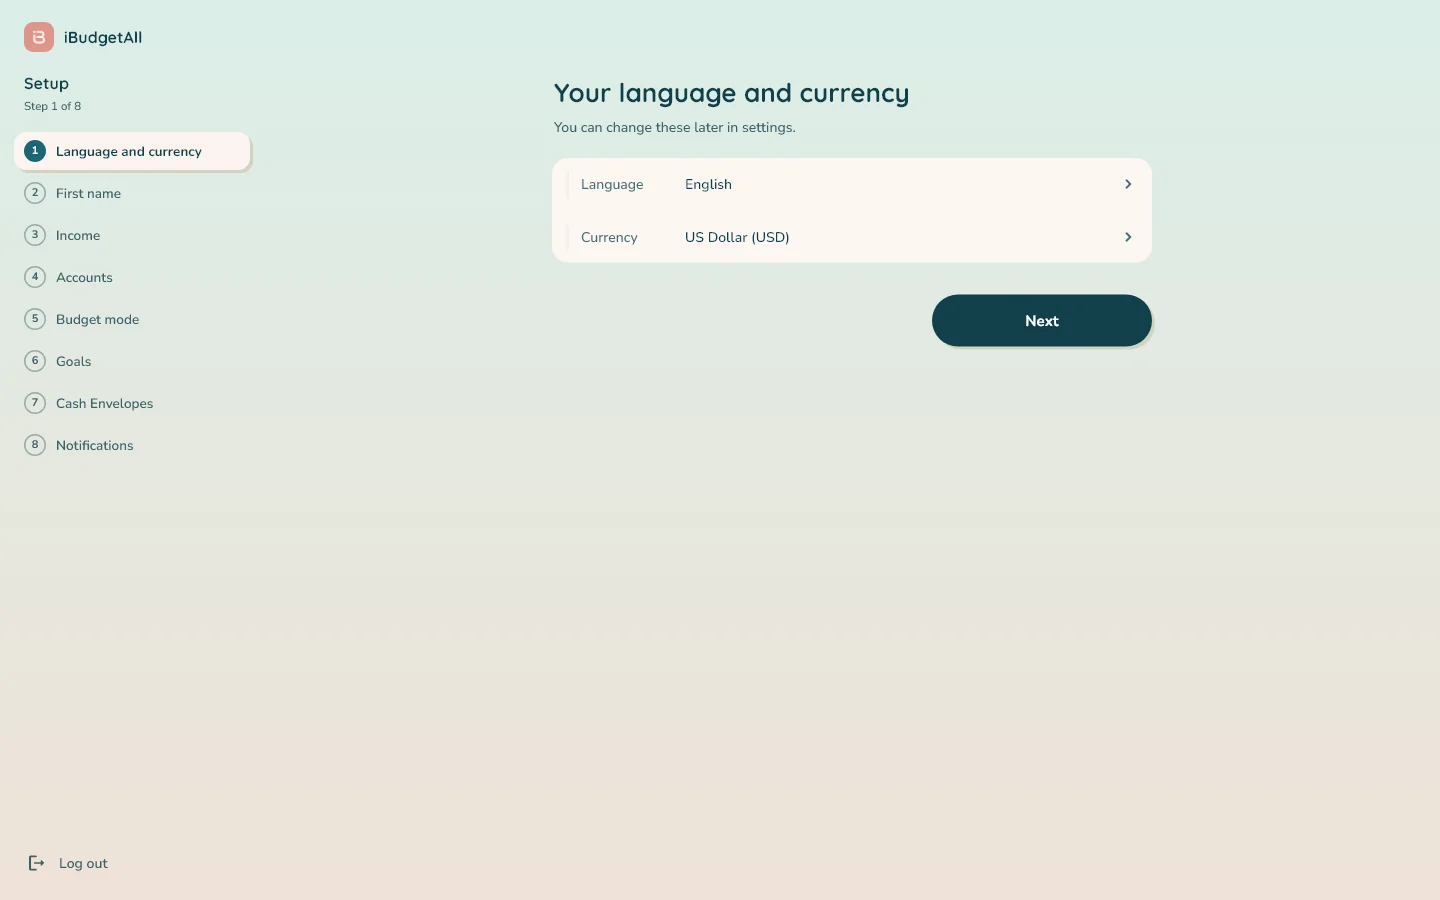
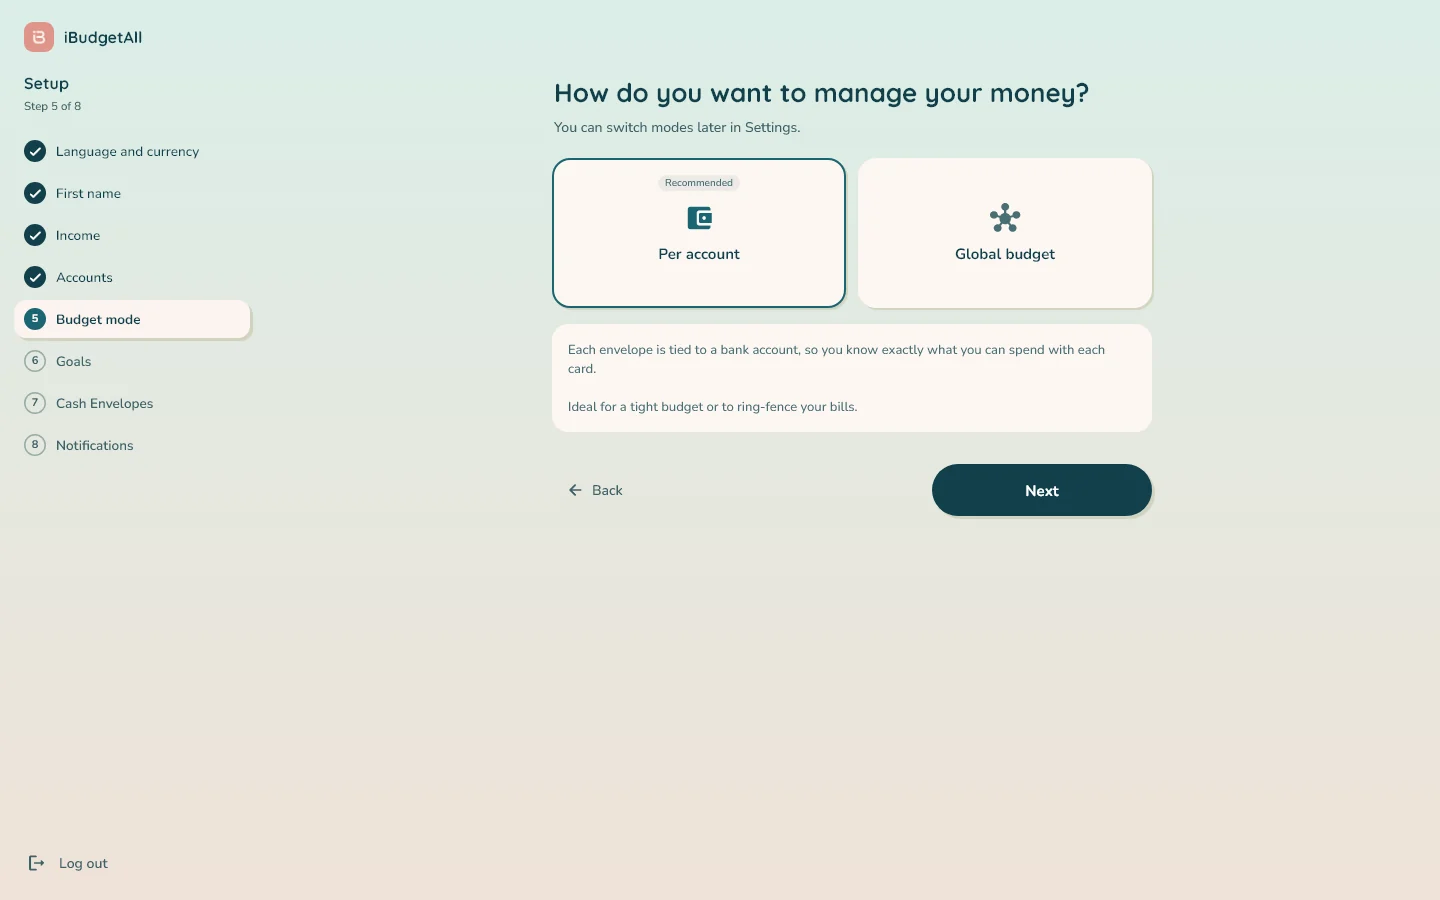
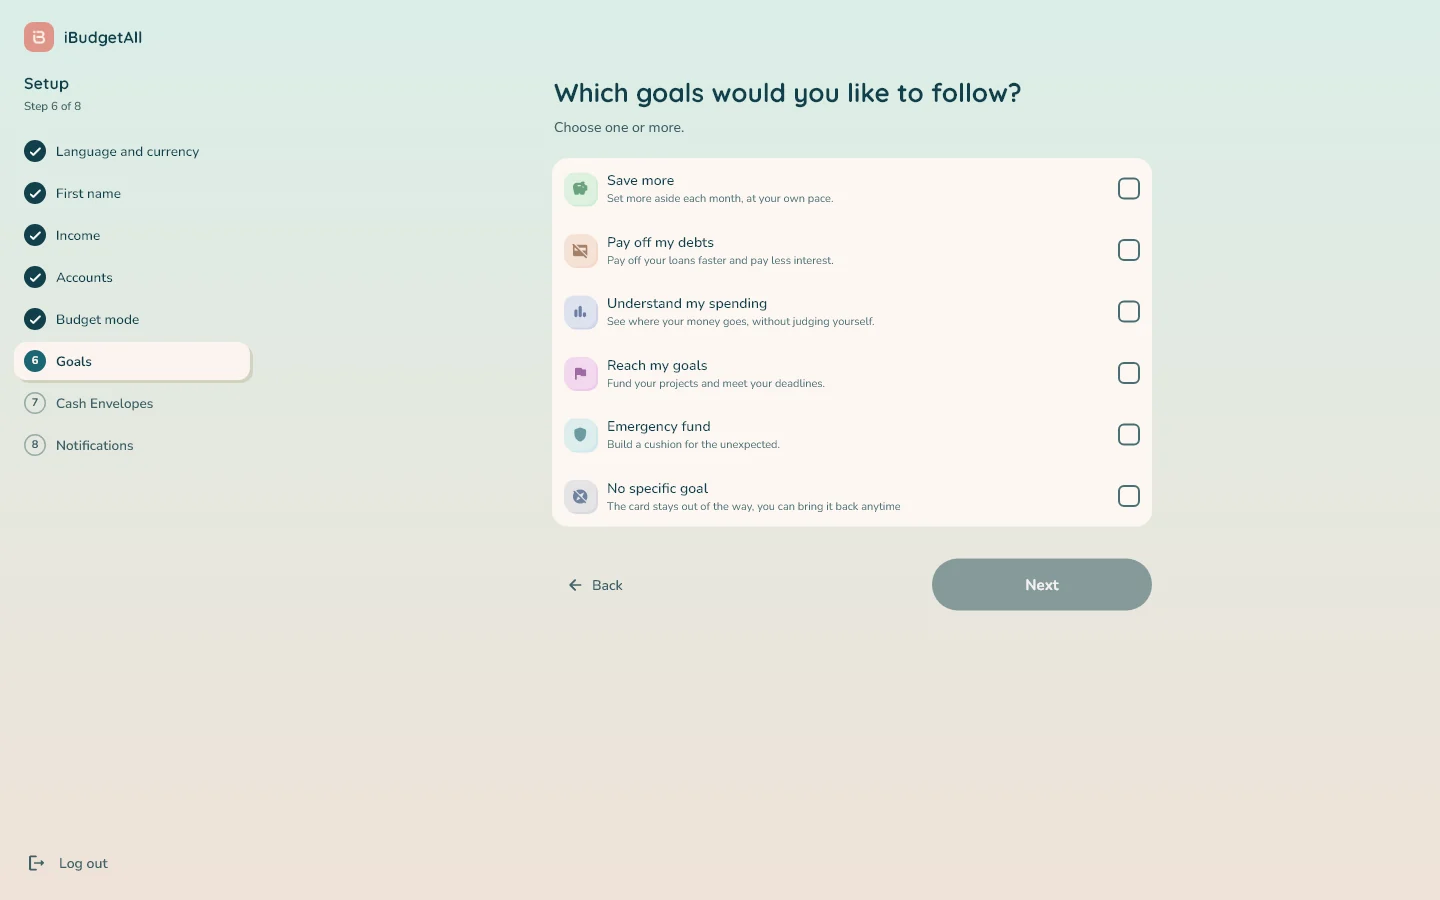
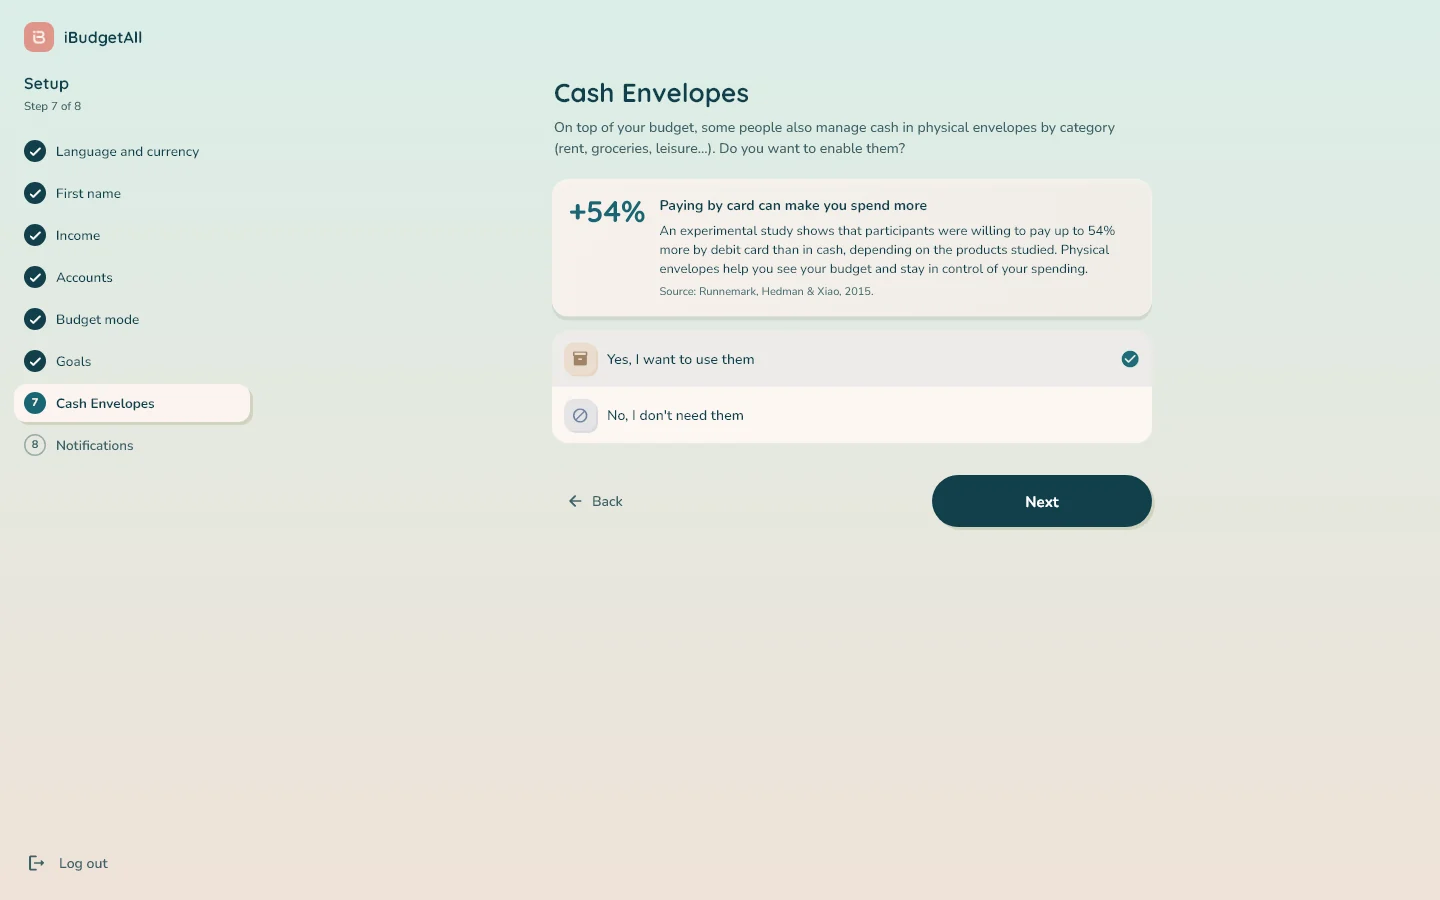
For a new account, the setup takes up the whole page. On the left, the “Setup” sidebar lists the eight steps and shows where you are, for example “Step 1 of 8”. A completed step is checked: click it to go back to it.
Each page ends with “Back” and “Next”. “Log out”, at the bottom of the sidebar, signs you out without losing anything: the setup will pick up where you left off.
The eight steps:
- “Language and currency”.
- “First name”: it personalizes your home page.
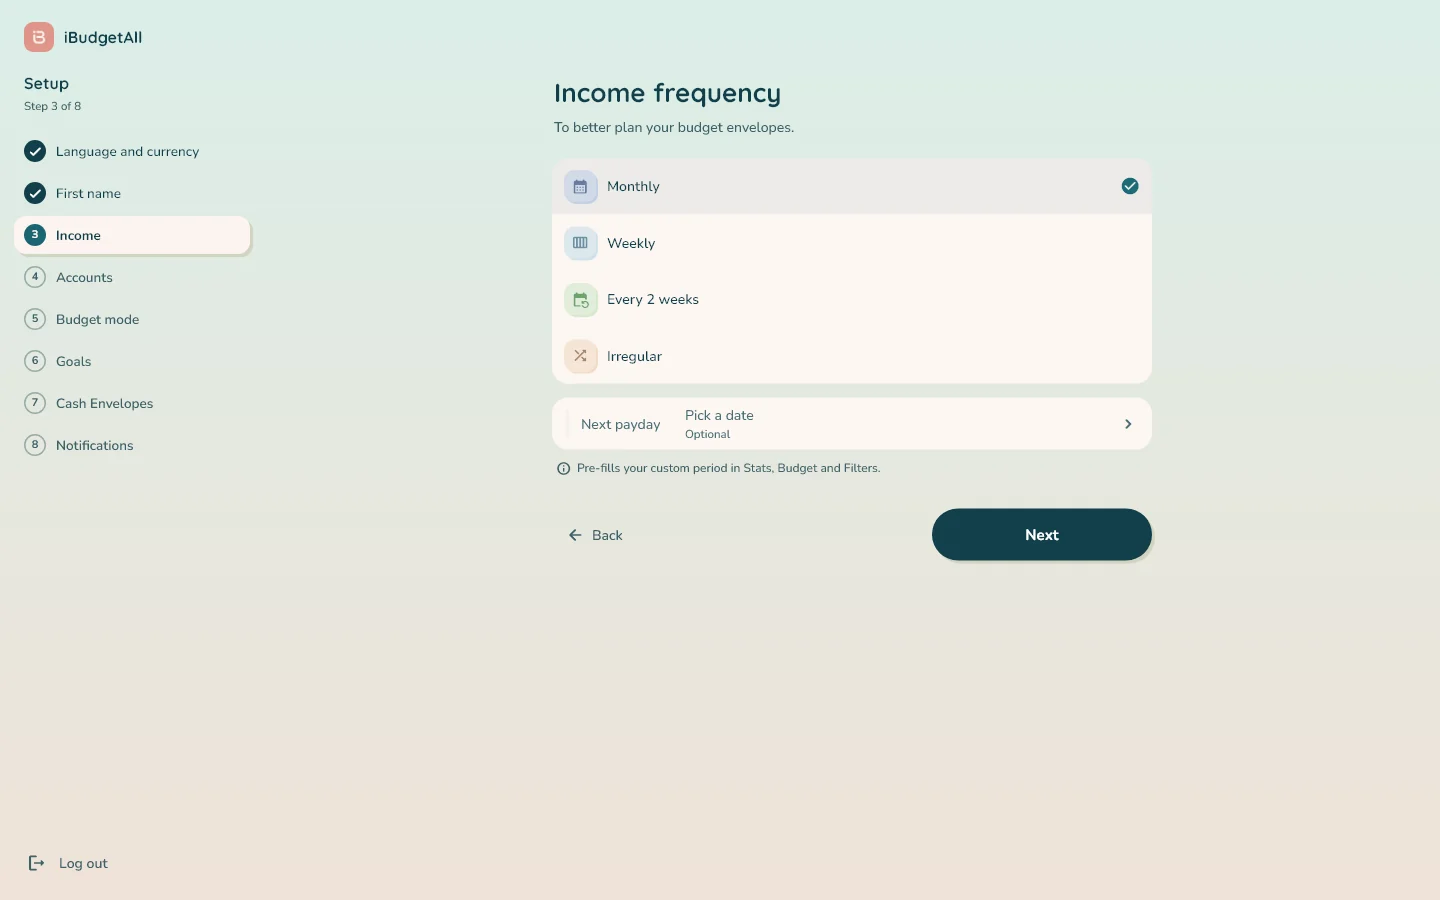
- “Income”: the “Income frequency” (“Monthly”, “Weekly”, “Every 2 weeks” or “Irregular”) and, if you wish, the date of your “Next payday”.
- “Accounts”: your bank accounts (see below).
- “Budget mode”: “Per account”, recommended, or “Global budget”.
- “Goals”: one or more, for example “Emergency fund” or “Pay off my debts”.
- “Cash Envelopes”: “Yes, I want to use them” if you also manage cash, otherwise “No, I don't need them”.
- “Notifications”: “Vigilant”, “Balanced” or “Minimal”.
Click “Finish”: your budget opens.
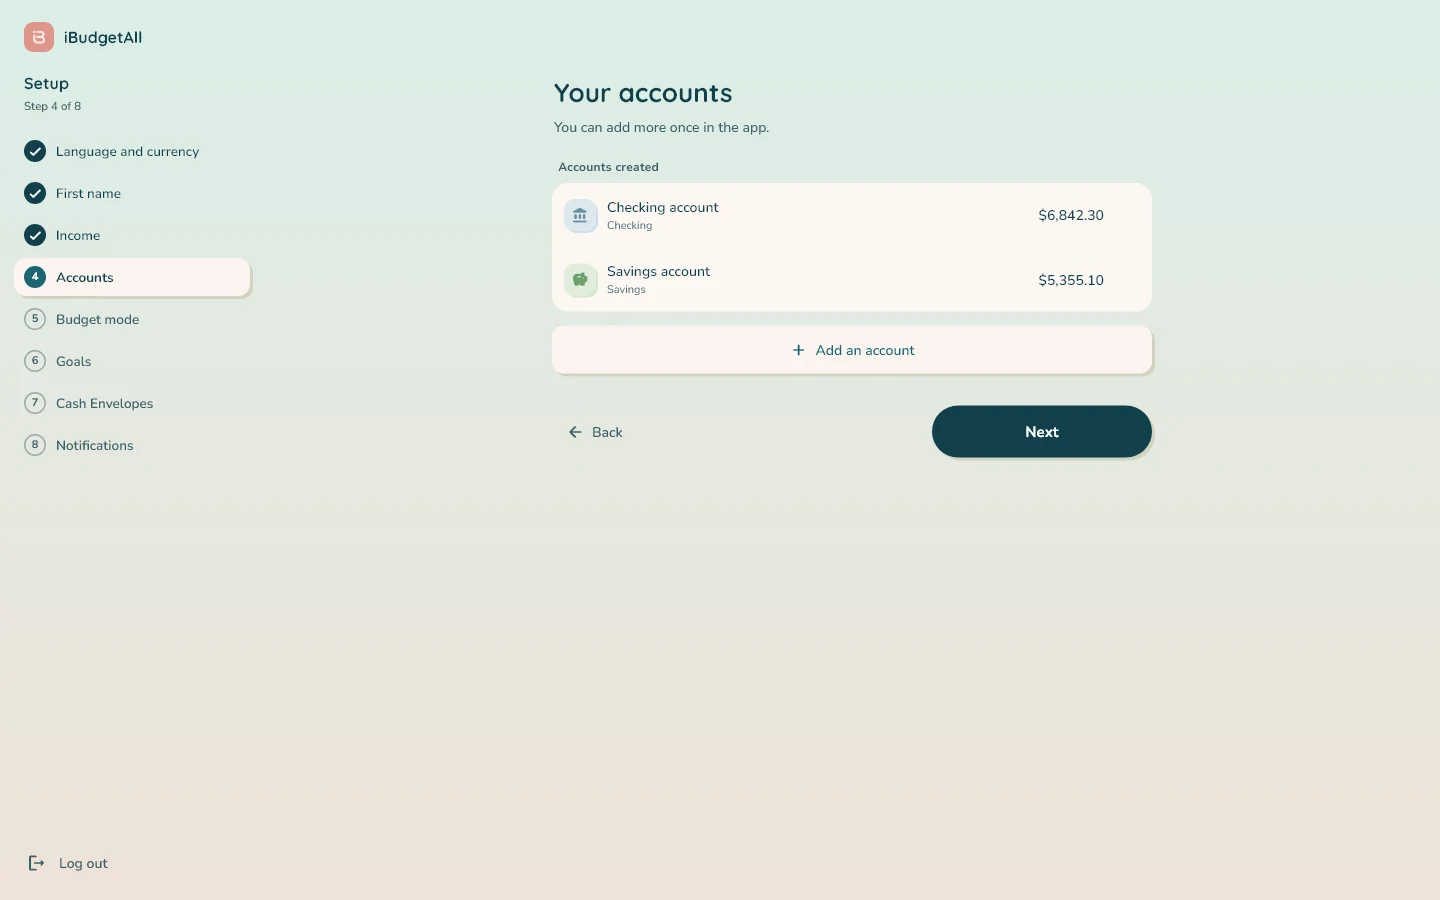
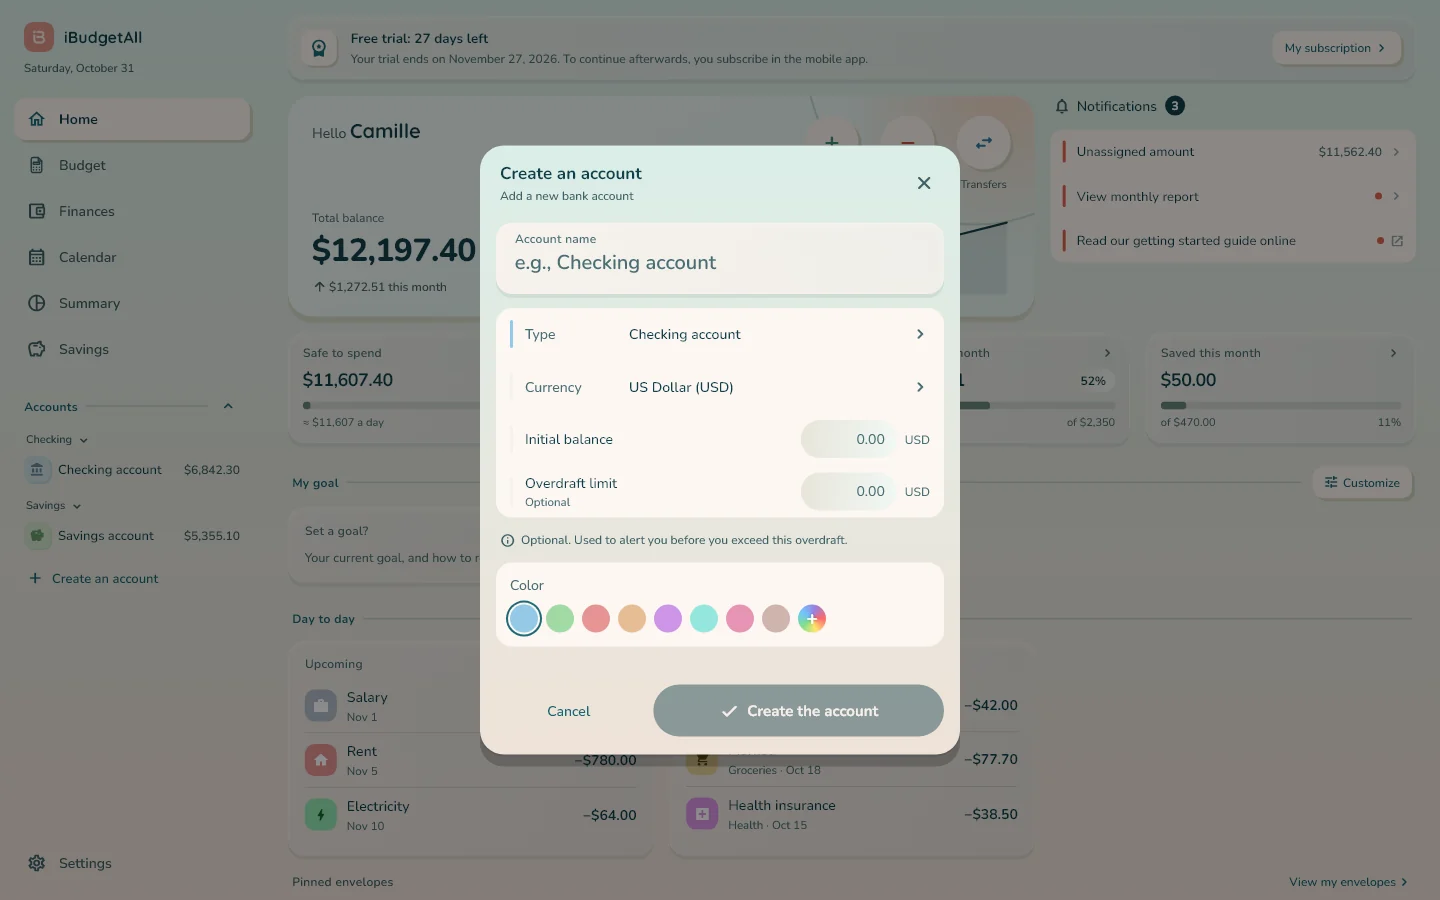
Your accounts. On the “Your accounts” page, click “Add an account”. A window opens in the middle of the page: enter the “Account name”, its “Type”, its “Currency”, its “Initial balance”, optionally its “Overdraft limit”, and a “Color”. Click “Create the account”.
The initial balance is the one number you must get right: enter the real balance of your account, as your bank shows it today. Left empty, it counts as zero, and all your numbers will be off by that amount.
Each account you create appears in the “Accounts created” list. To edit one, hover over its row and use the ⋮ menu.
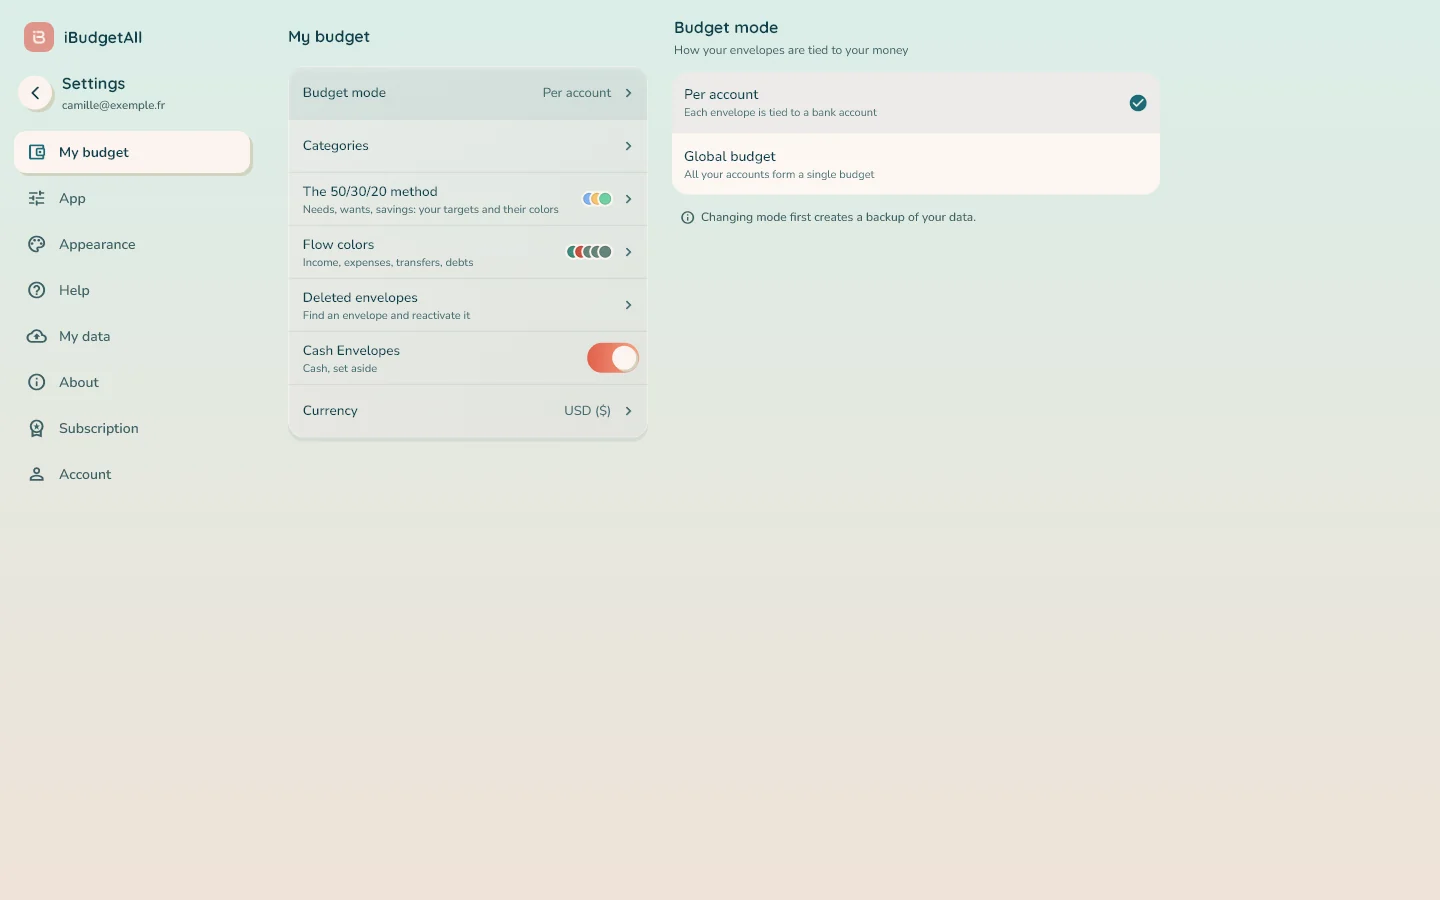
The budget mode. “Per account” ties each envelope to one specific bank account: you know what you can spend with each card. “Global budget” brings all your accounts together into a single budget. The guide “Getting started with iBudgetAll” compares the two in detail. You can switch modes later.
Notifications. The page explains: “Reminders arrive on this computer if you allow them in your browser (offered at the end of setup), and in the iBudgetAll app on your phone if you use it with this account.” The preset you choose here applies to both.
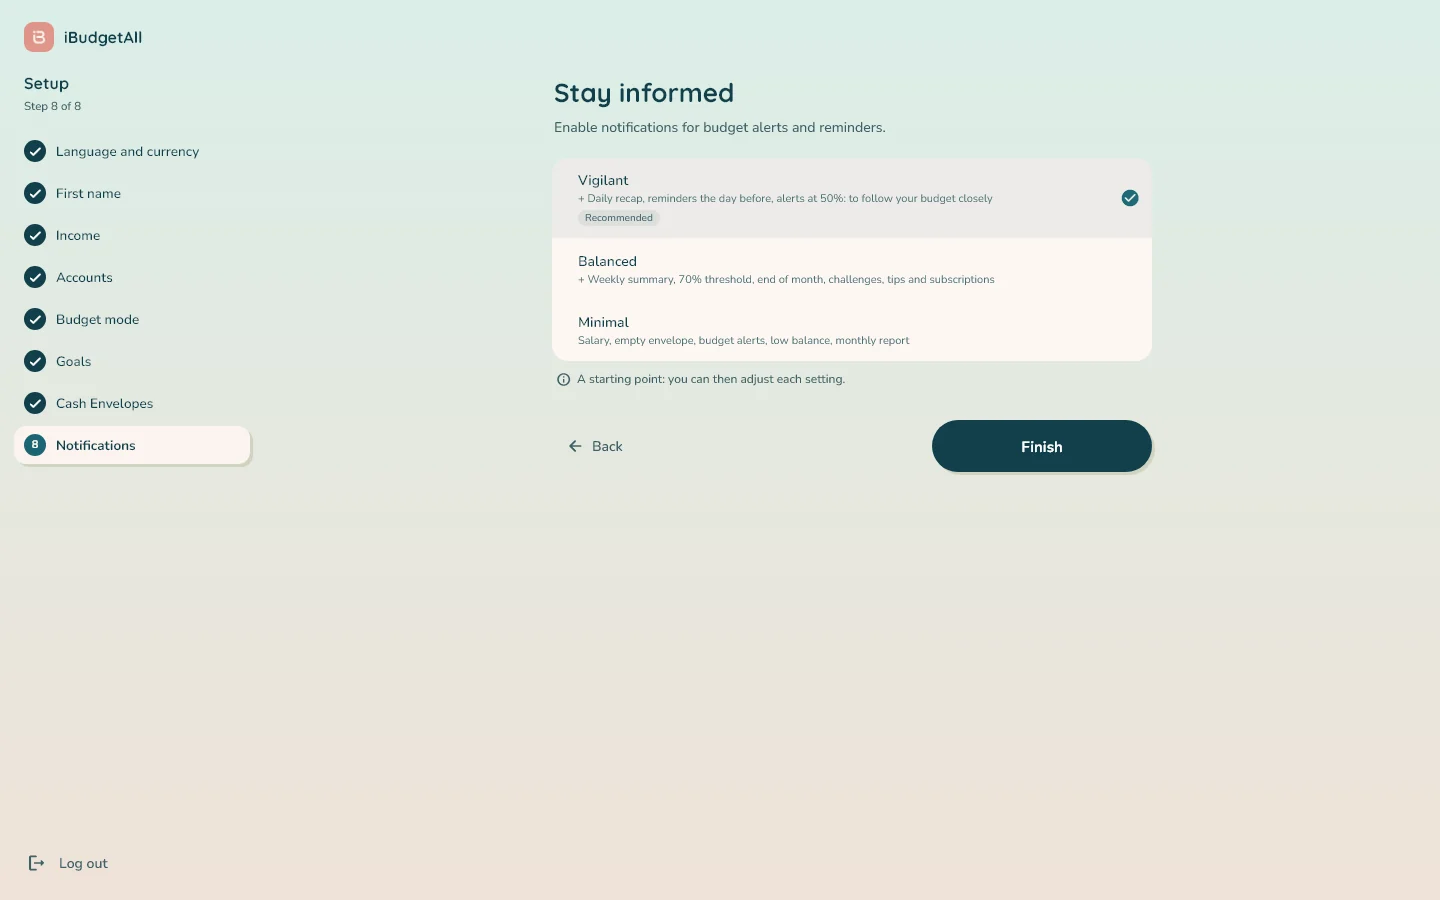
On a computer, the setup has eight steps instead of nine: the home screen widget step only exists on the phone. The introduction pages shown on first launch don't exist either: the left panel of the sign-in page replaces them.
An older account?
If your account dates back to the first versions of the app, the migration wizard opens instead. The sidebar is then titled “Returning account” and has two sections: “Bringing over your data” (your data, what we found, your accounts, the links to your banks, the budget mode, the migration, the result, the starting balances), then the last steps of the “Setup”. Follow them in order, as on the phone.
Opening the app for the first time
At the end of the setup, the “Your budget is ready” window offers to start with your income: “Add my income”, or “Later” to go to “Home”.
The income form is already filled in from your answers. The app then offers your fixed expenses (“Choose my fixed expenses”): check the ones you pay, then enter each amount. It ends with “Connect your bank?”, which is optional. Each step can wait with “Later”.
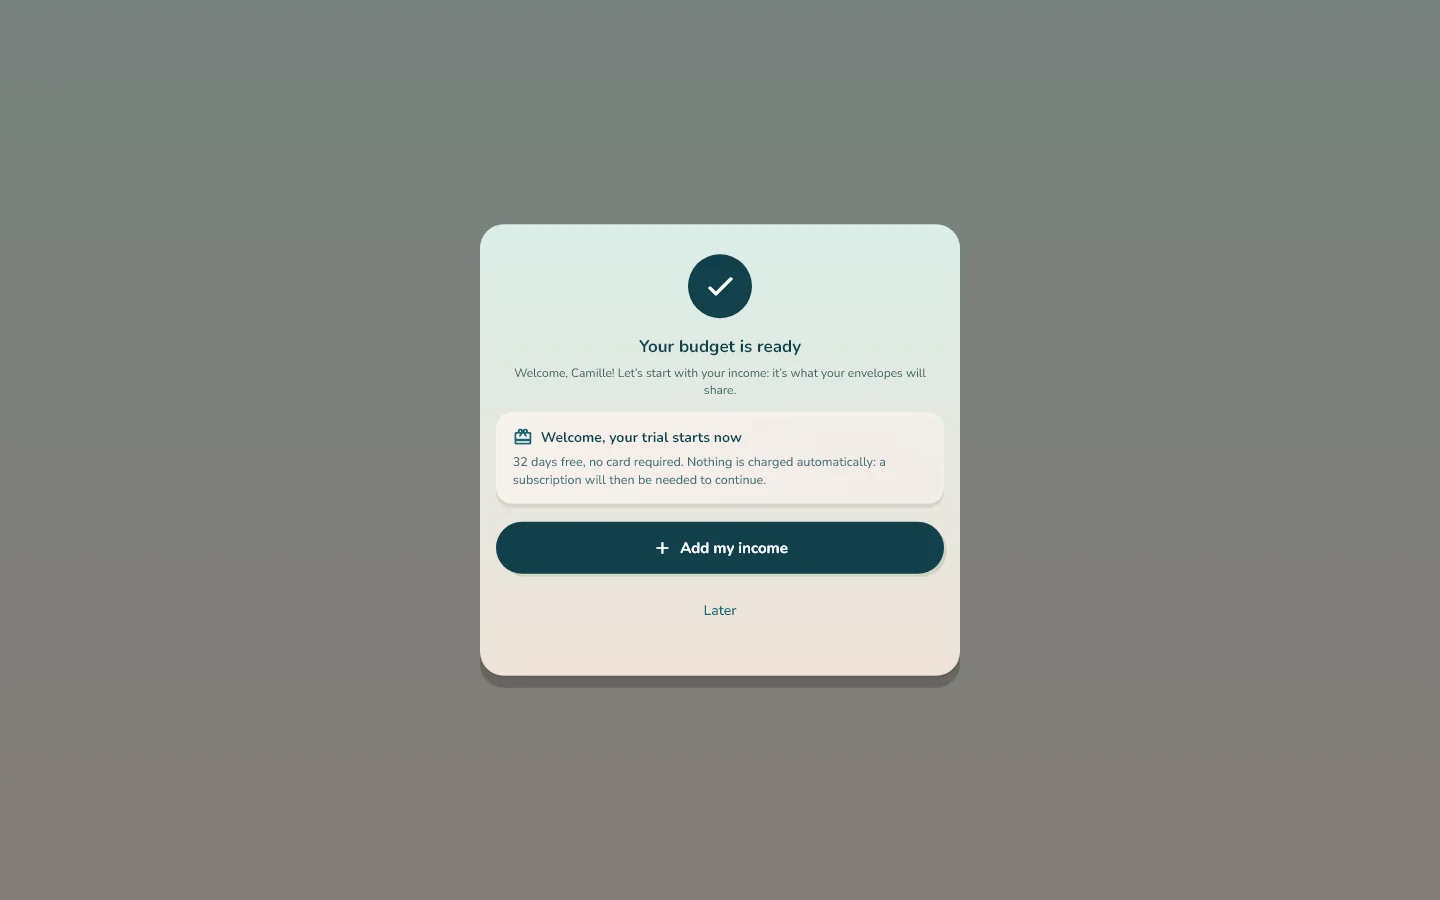
Next, the “Reminders on this computer?” window asks whether you want to receive them here: “Turn on” opens your browser's permission request, and “Later” closes it. It's offered only once, in this browser.
If your account doesn't have a first name yet, a window then asks for it (“What should we call you?”): “Save”, or “Later”.
Find your way around and work day to day
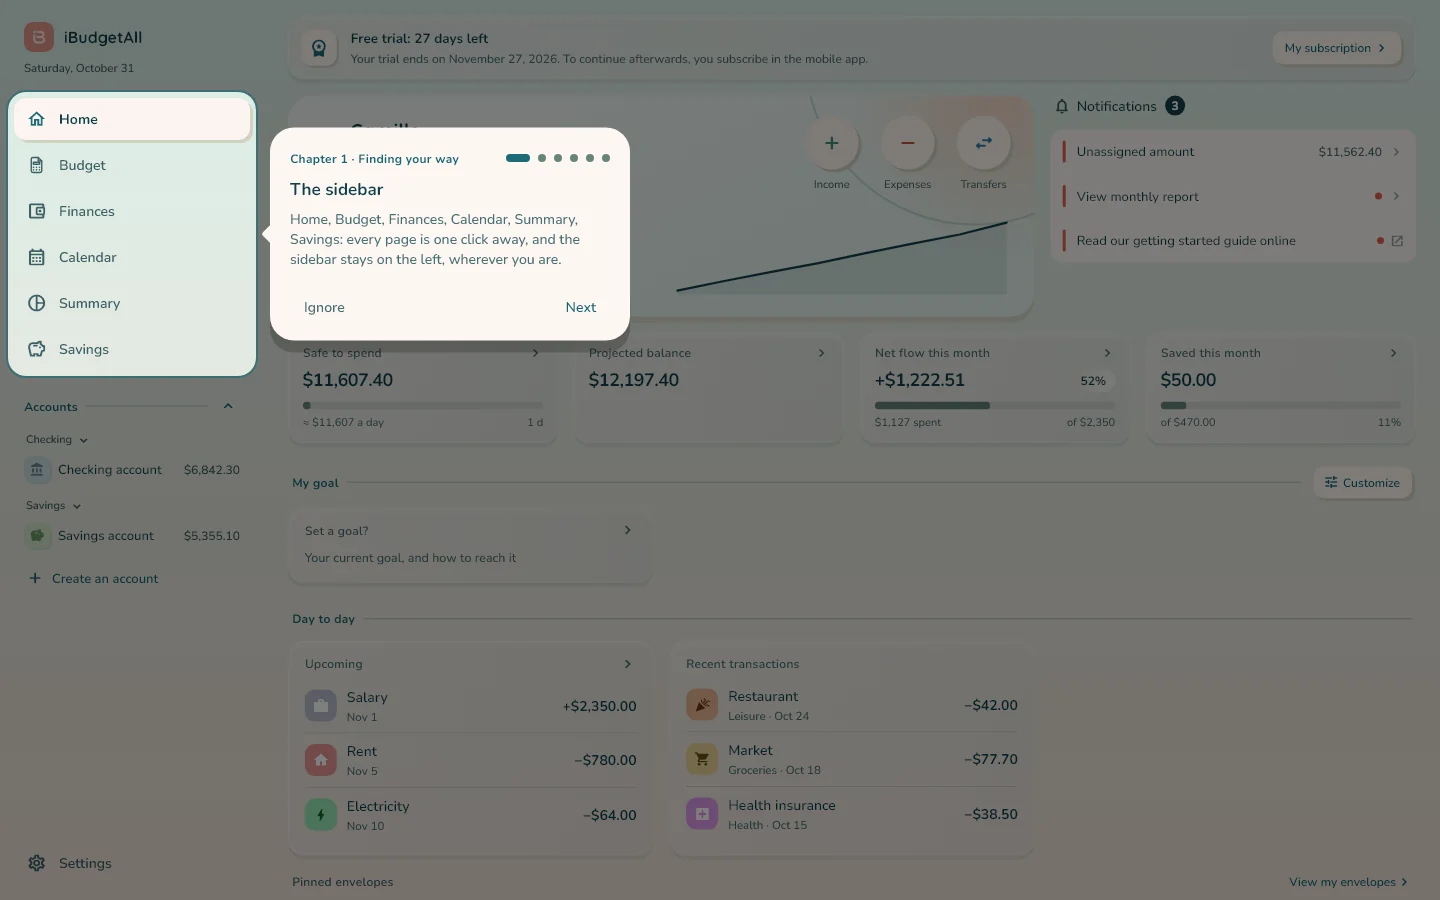
The sidebar
Everything starts from the sidebar, on the left of the page:
- the iBudgetAll name and today's date: clicking the name takes you back to “Home”;
- “Home”, “Budget”, “Finances”, “Calendar”, “Summary” and “Savings”;
- “Accounts”: your accounts grouped by type (“Checking”, “Savings”…), each with its balance; a click opens the account's page; the arrow collapses the list;
- “Create an account”, below the list;
- “Settings”, at the bottom.
Within the same type, you can move an account by dragging it with the mouse: the order is the same as on the phone.
Home
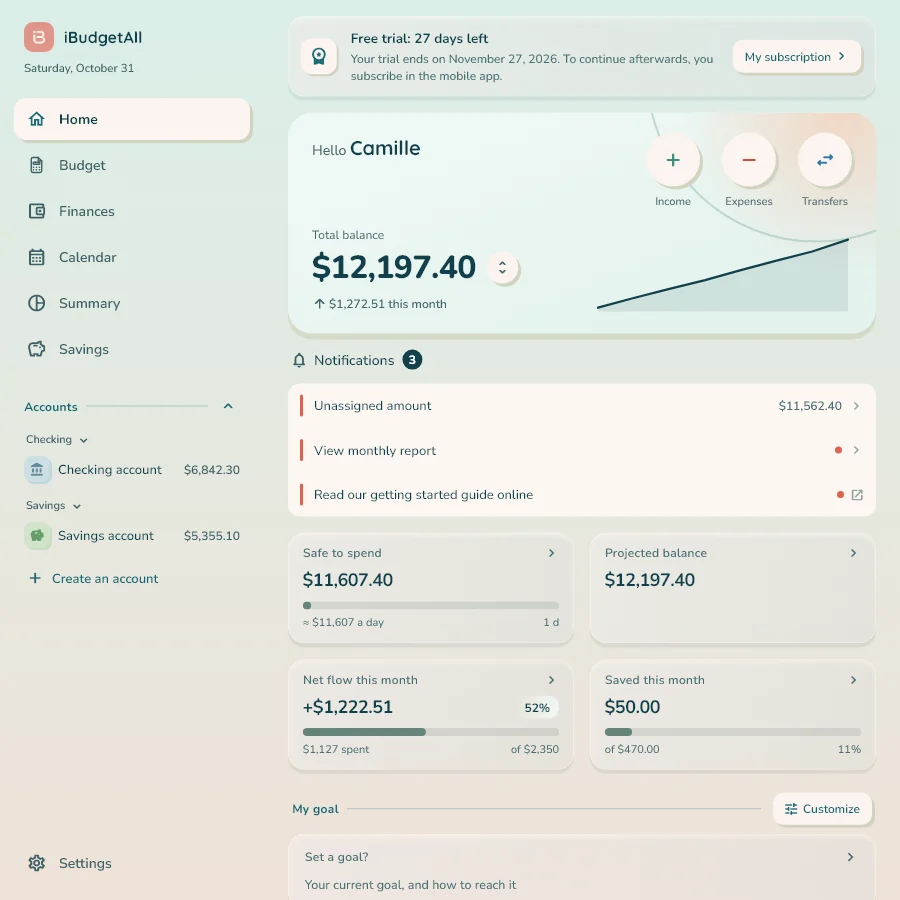
“Home” is the opening page. At the top:
- during the trial, the “Free trial” banner and the number of days left (step 5);
- the “Hello” card, with your “Total balance” and three round buttons: “Income”, “Expenses” and “Transfers”;
- on the right, the app's “Notifications”: for example “Unassigned amount”, when money is waiting to be assigned. On a new account, “Add your income and fixed expenses” picks up the entry where you left off, then, after 7 days, opens “Finances”; a dot on “Finances”, in the sidebar, reminds you until it is done;
- four figures: “Safe to spend”, “Projected balance”, “Net flow this month” and “Saved this month”. Each one opens with a click.
Further down, “My goal” (“My goals” if you have several) tracks the goals chosen during setup. “Day to day” brings together your “Upcoming” payments, your “Recent transactions” and your “Pinned envelopes”; “View my envelopes” leads to “Budget”.
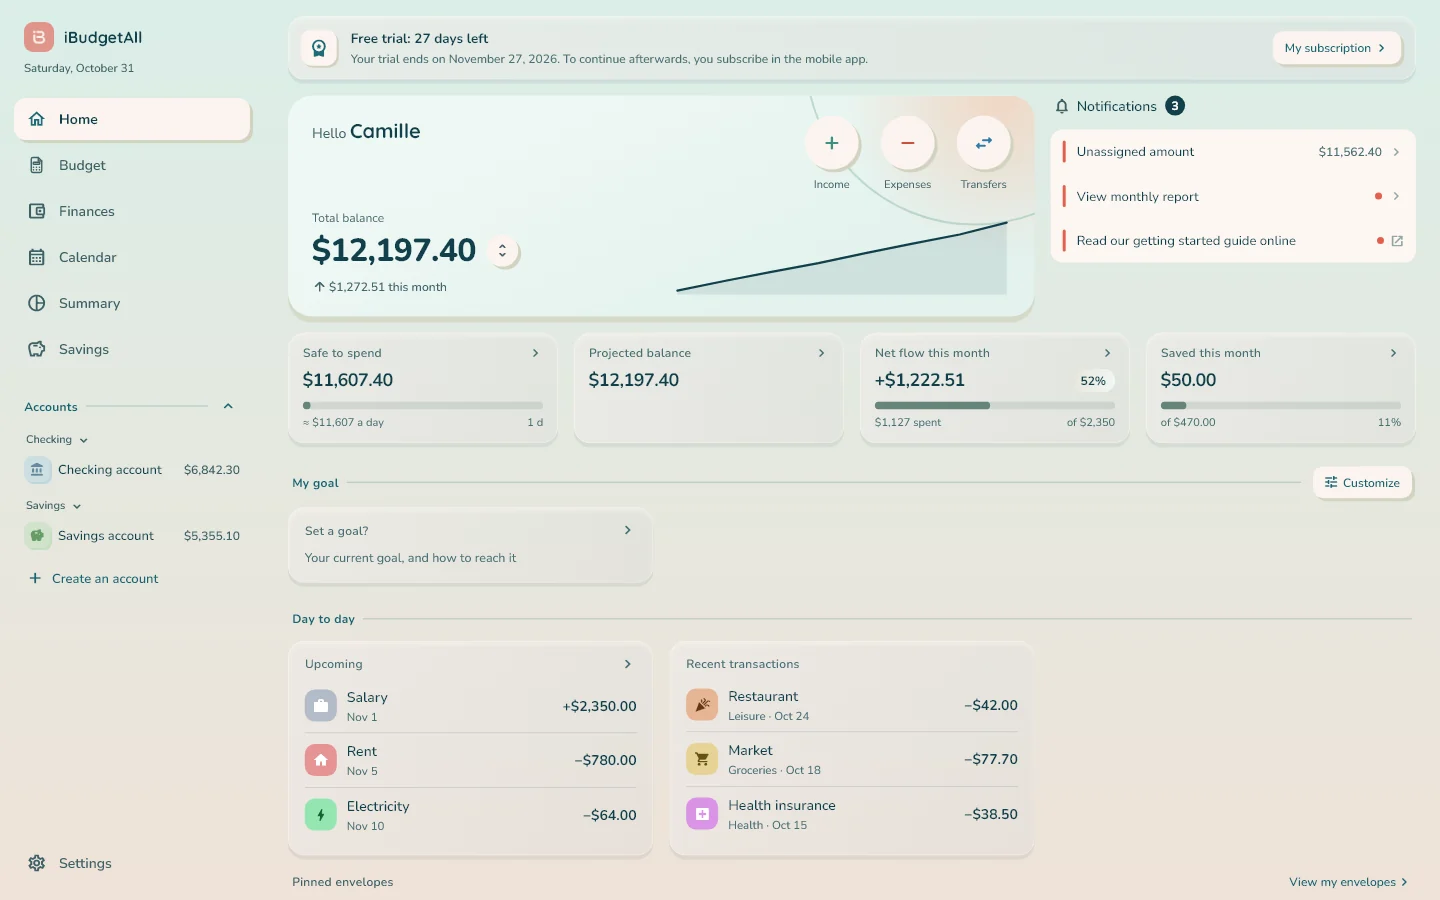
Your statistics are on the Home page. The “My figures” section replaces the phone's Statistics page. Choose the period with the arrows, and the account with “All accounts”.
There you'll find “Expenses by category” (with “All”, “Variable” or “Fixed”: the fixed ones are your recurring expenses), “Period comparison”, “Income and expenses” over the last 12 months, “Fixed expenses”, “Spending heatmap” and “Top expenses”. Click a category to open its details. “Reports” opens the monthly and yearly reports, and the round “Export transactions” button saves your transactions to a file.
The “Customize” button, to the right of the “My goal” title, lets you choose which cards are shown.
Budget
“Budget” is the page where you assign your money: it's the phone's “My Budget”, with your envelopes in tables.
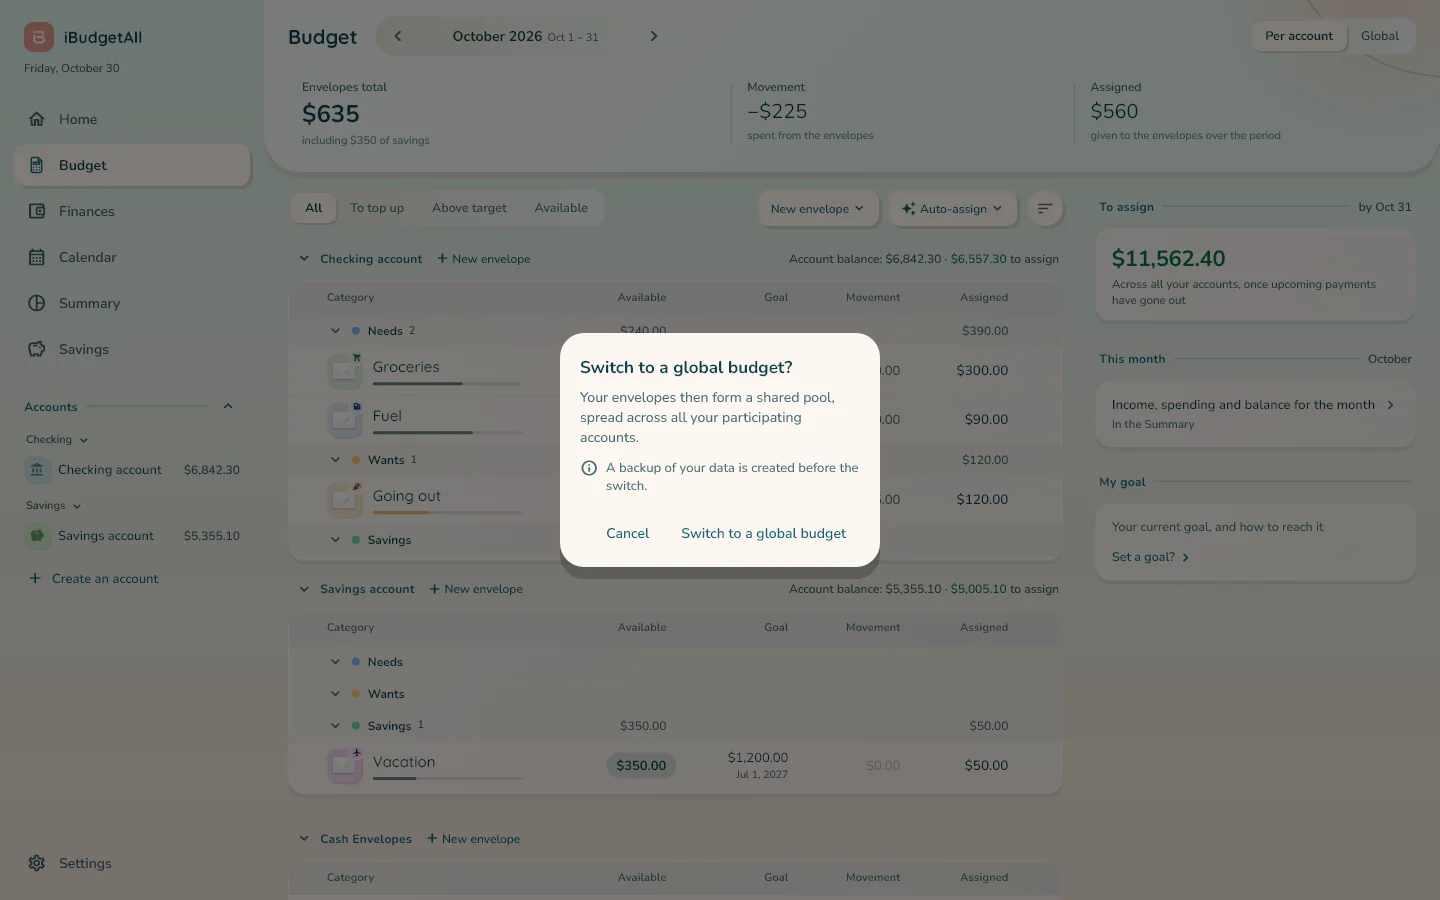
At the top, the period and its arrows, then “Per account” and “Global”: this choice changes your budget mode. The app asks you to confirm, and creates a backup of your data before the switch.
Below, three figures add up your envelopes over the period: “Envelopes total”, “Movement” (“spent from the envelopes”) and “Assigned” (“given to the envelopes over the period”). Your income, your expenses and your savings capacity are in “Finances”.
Each account has its own card. Its title shows “New envelope” right after the account name and, on the right, the “Account balance”, then the money in that account that is still “… to assign”. Its envelopes are grouped into “Needs”, “Wants” and “Savings”, with four columns:
- “Available”: what the envelope holds;
- “Goal”: the target amount per period, or the amount to reach for a savings envelope;
- “Movement”: what came into or went out of the envelope during the period;
- “Assigned”: what you assigned to it during the period.
“Cash Envelopes” have their own card, at the bottom, if you use them.
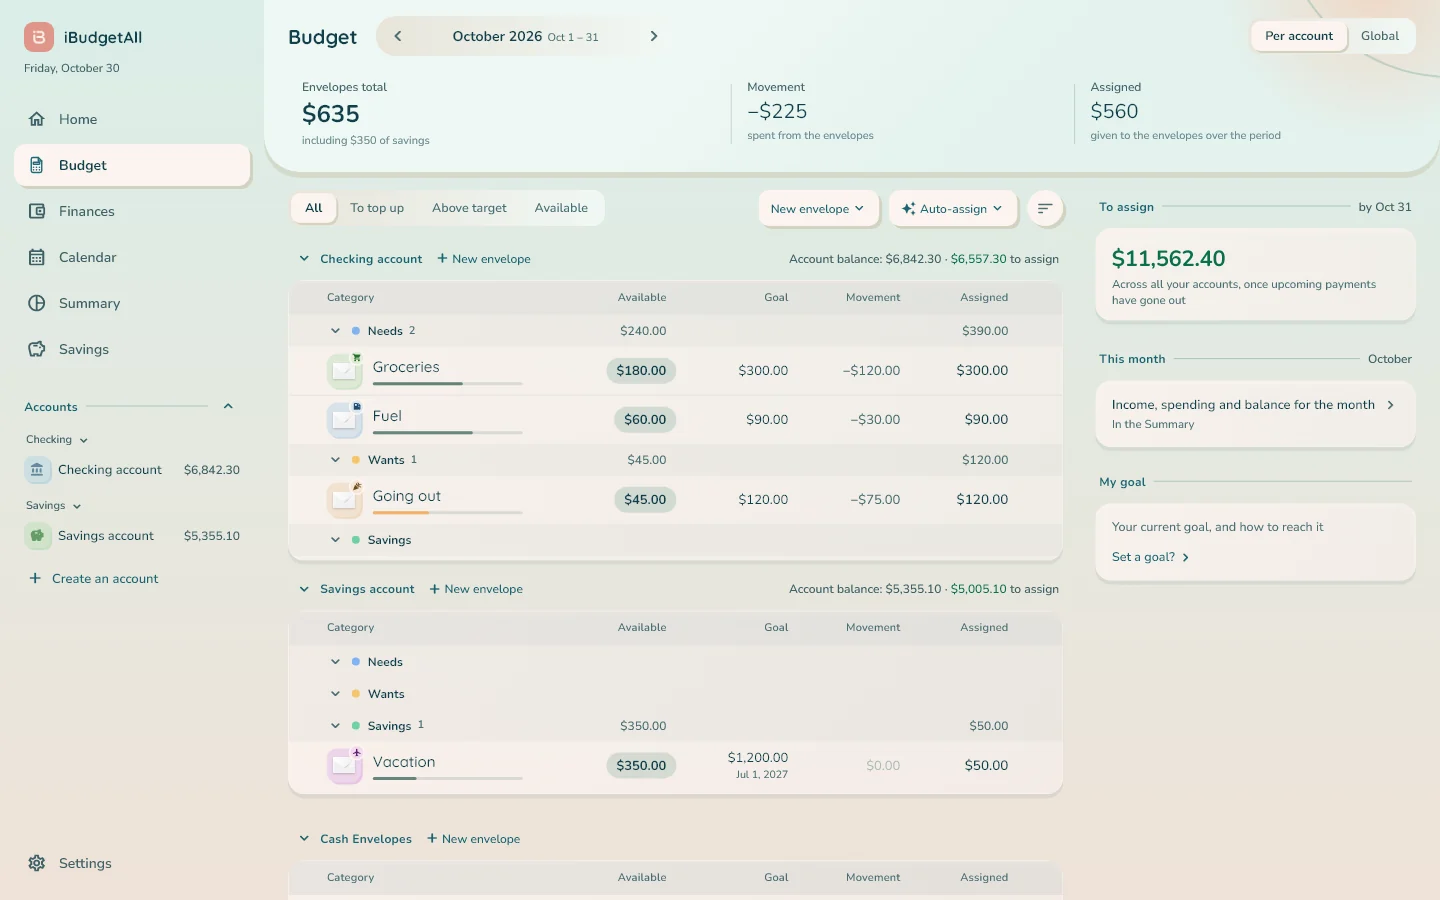
On the right, the “To assign” card shows the total amount to distribute, “Across all your accounts, once upcoming payments have gone out”. Below it, “This month” leads to the “Summary” (“Income, spending and balance for the month”), then “My goal”.
Above the tables are the filters “All”, “To top up”, “Above target” and “Available”. On the right, “New envelope” and “Auto-assign”, then the round “Sort and display” button, which sorts the rows (“Manual” or “Alphabetical”) and chooses the “Row icon”: “Envelope”, “Category” or “None”.
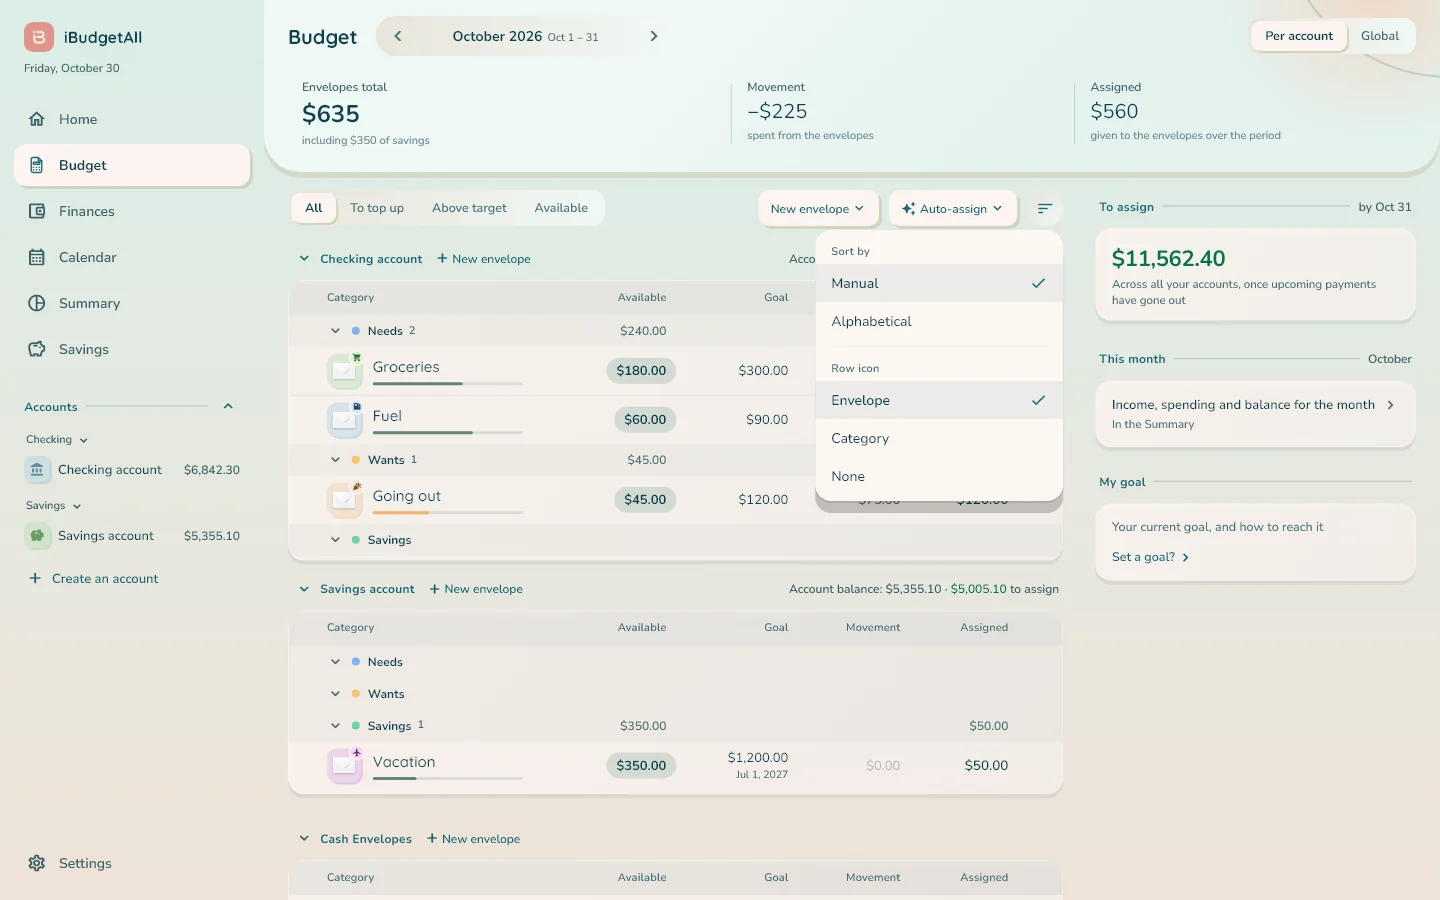
You can move an account by dragging its title: the order matches the sidebar.
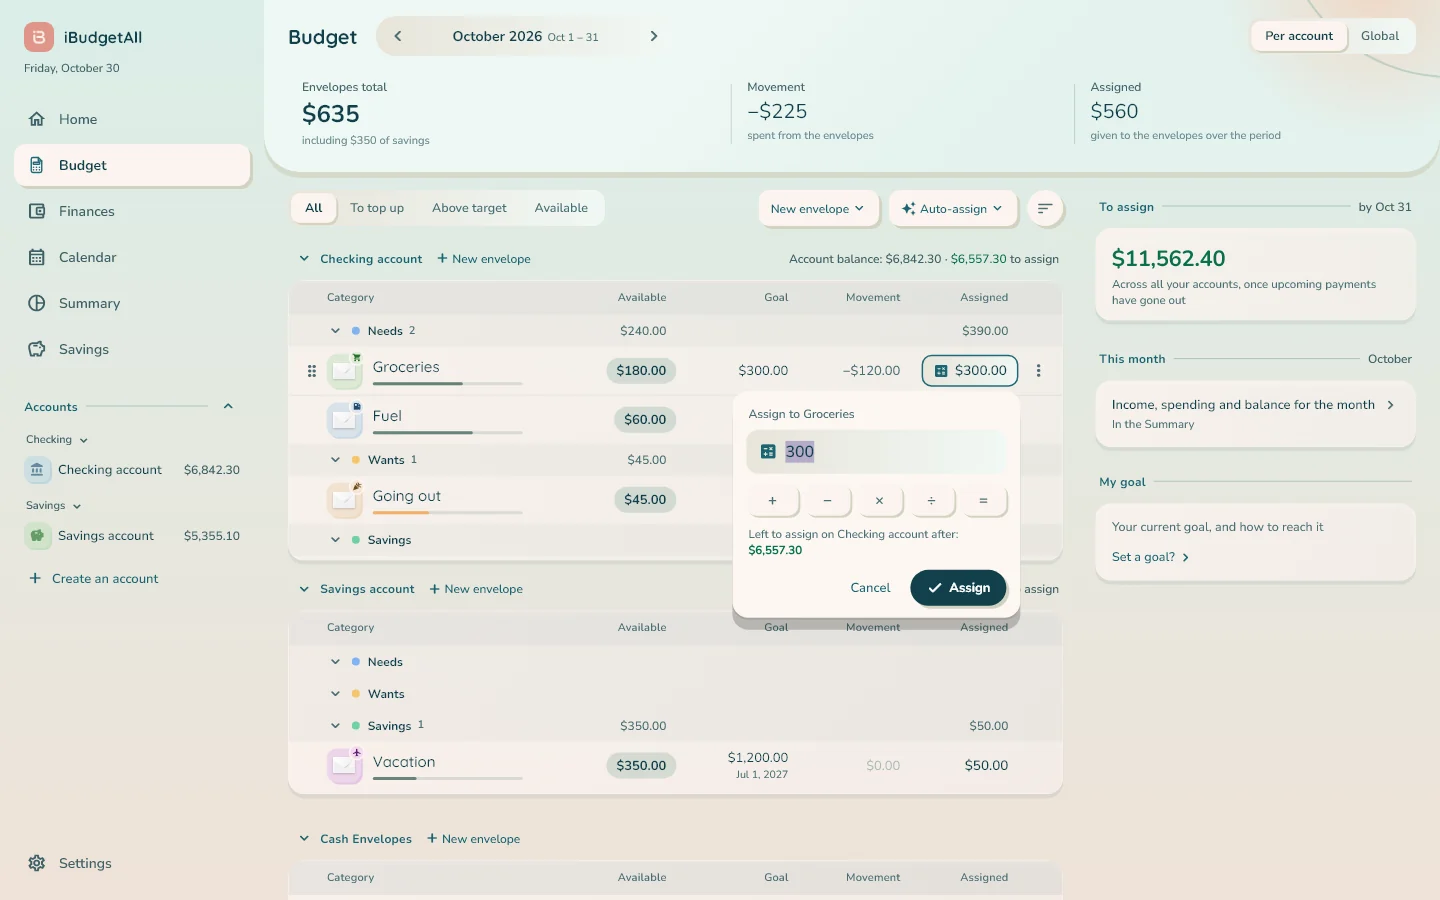
Assigning your money. Click the amount in an envelope's “Assigned” column. A bubble opens, titled “Assign to” followed by the envelope's name. Enter the amount; the + − × ÷ keys do the math for you. The bubble shows what will be left to assign in the account afterwards. Click “Assign”.
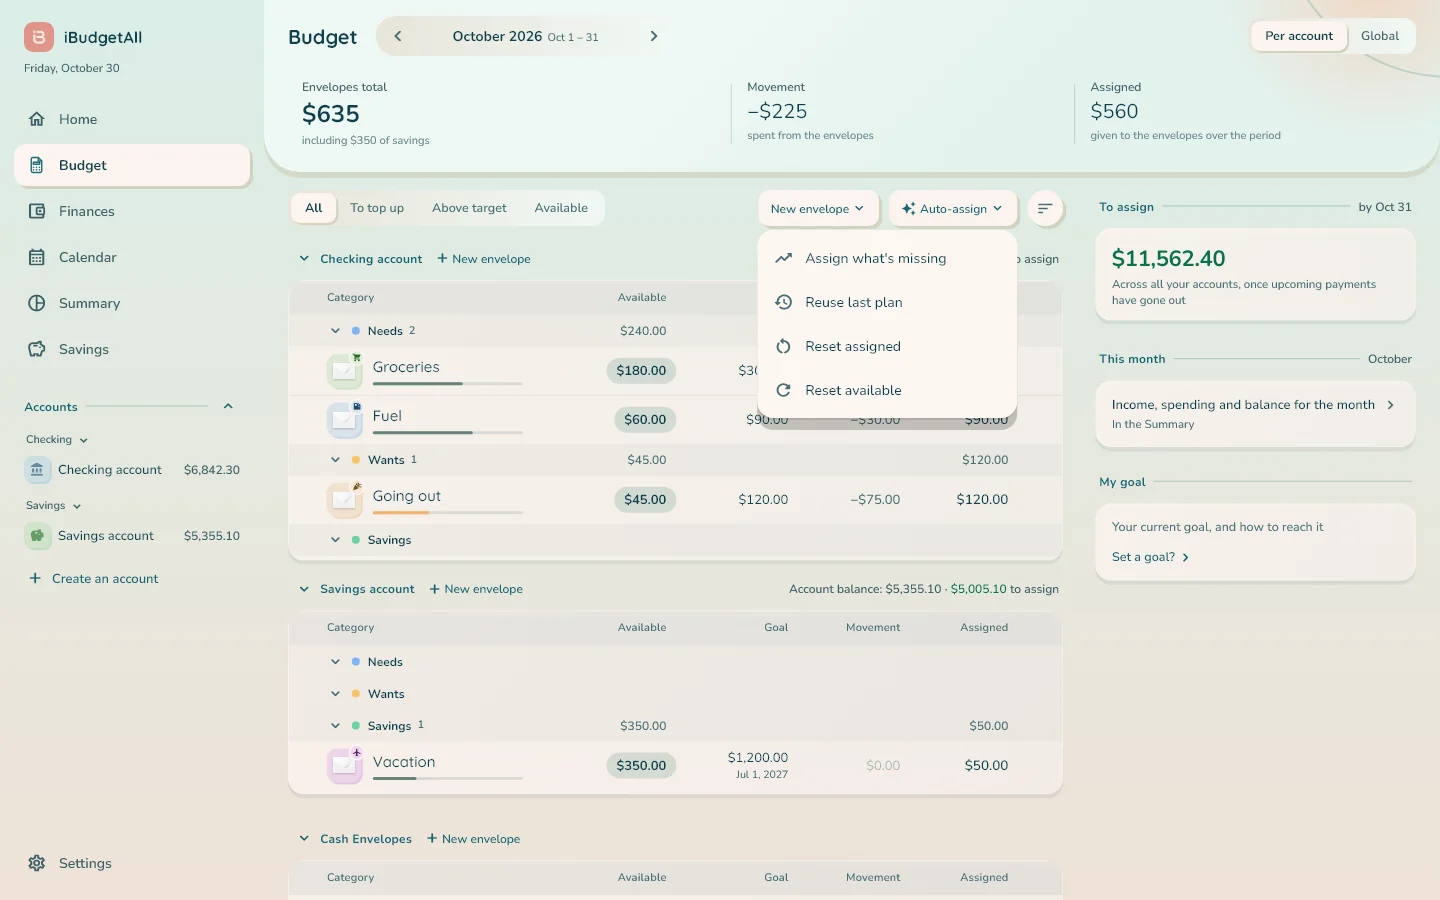
“Auto-assign” offers to do it in one go: “Assign what's missing”, “Reuse last plan”, “Reset assigned” or “Reset available”. The app shows you how many envelopes will change before anything is applied; with “Assign what's missing”, you can correct each amount or remove a line before clicking “Apply”. “Reuse last plan” brings back the amounts you assigned in the previous cycle, or the plan you validated on your phone; an envelope you've already assigned by hand keeps its amount, and cash envelopes aren't touched.
A credit card among your accounts. A “Credit card” account counts toward the total: its negative balance lowers the large “To assign” figure, and no setting can exclude it. So read the “… to assign” amount on each account: that's the one that tells you what you can assign in that account. In “Global budget” mode, there's no line per account: the card's negative balance directly reduces what's left to assign.
The period arrows also let you prepare the next cycle: when that cycle starts, the app offers to apply this budget (“Apply” or “Ignore”); nothing is assigned without your approval. A past cycle can be viewed but not changed.
An envelope's actions. Hover over a row: “Spend” (the cart), “Transfer” and the ⋮ menu appear.
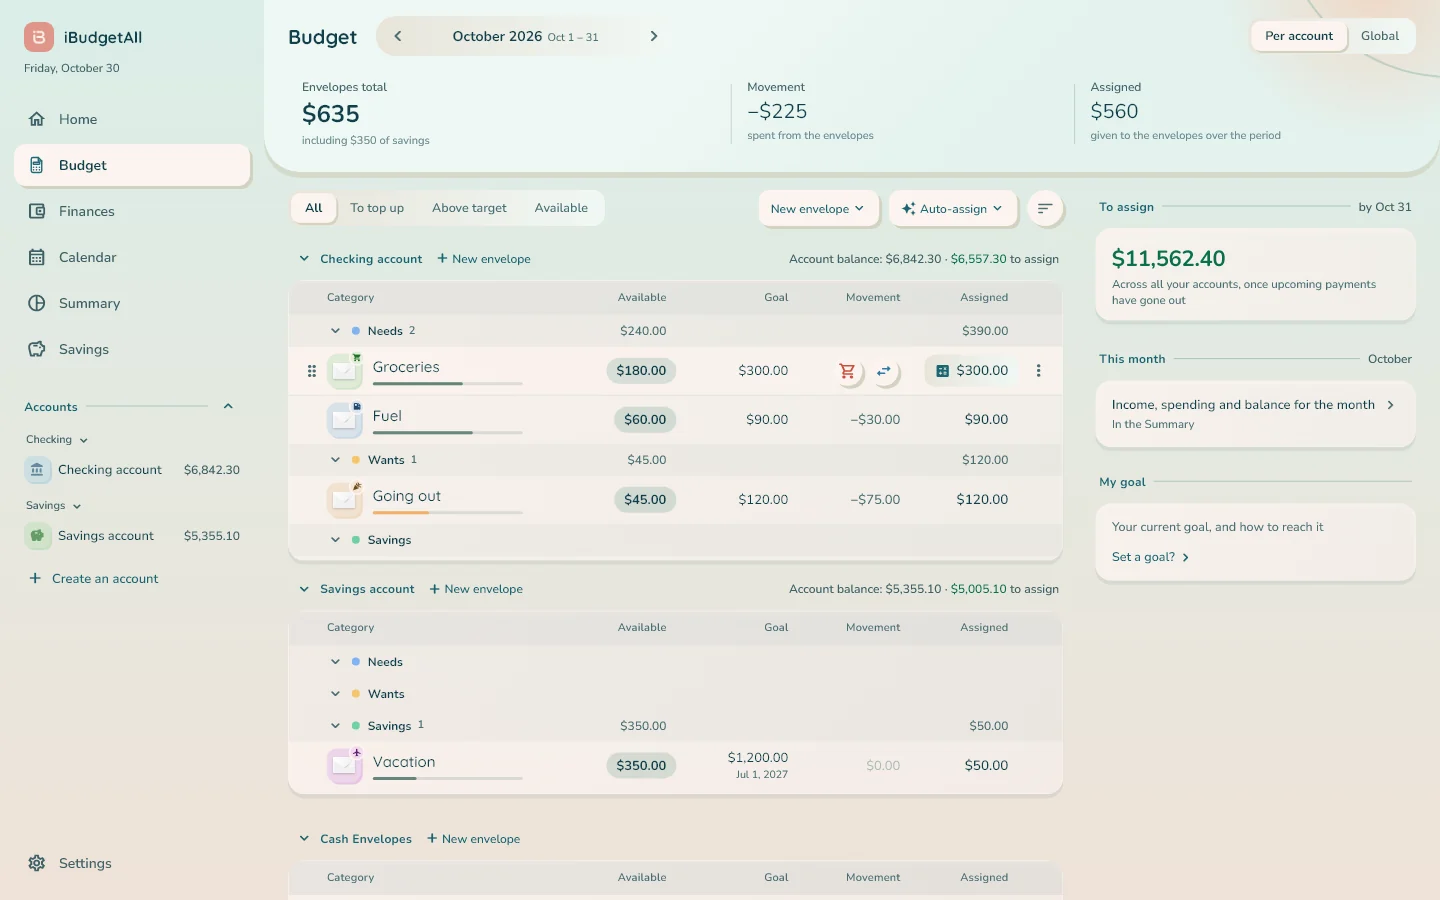
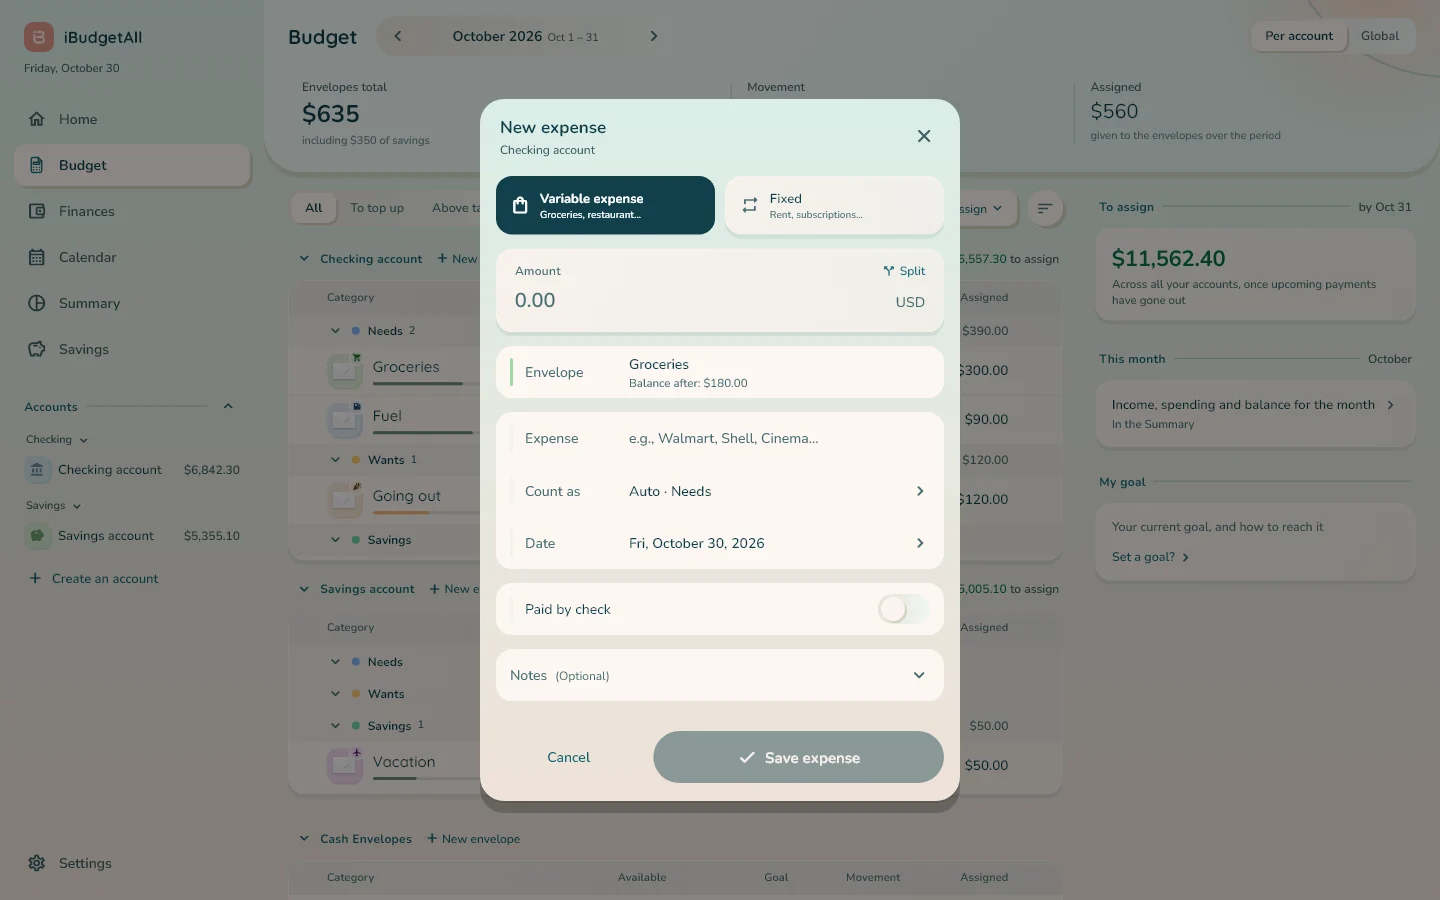
“Spend” opens the “New expense” window with the envelope already chosen. Enter the “Amount” and, if you want, the name of the “Expense”; under the envelope's name, you see its balance after the expense. Click “Save expense”. The amount is taken out of both the envelope and the account balance.
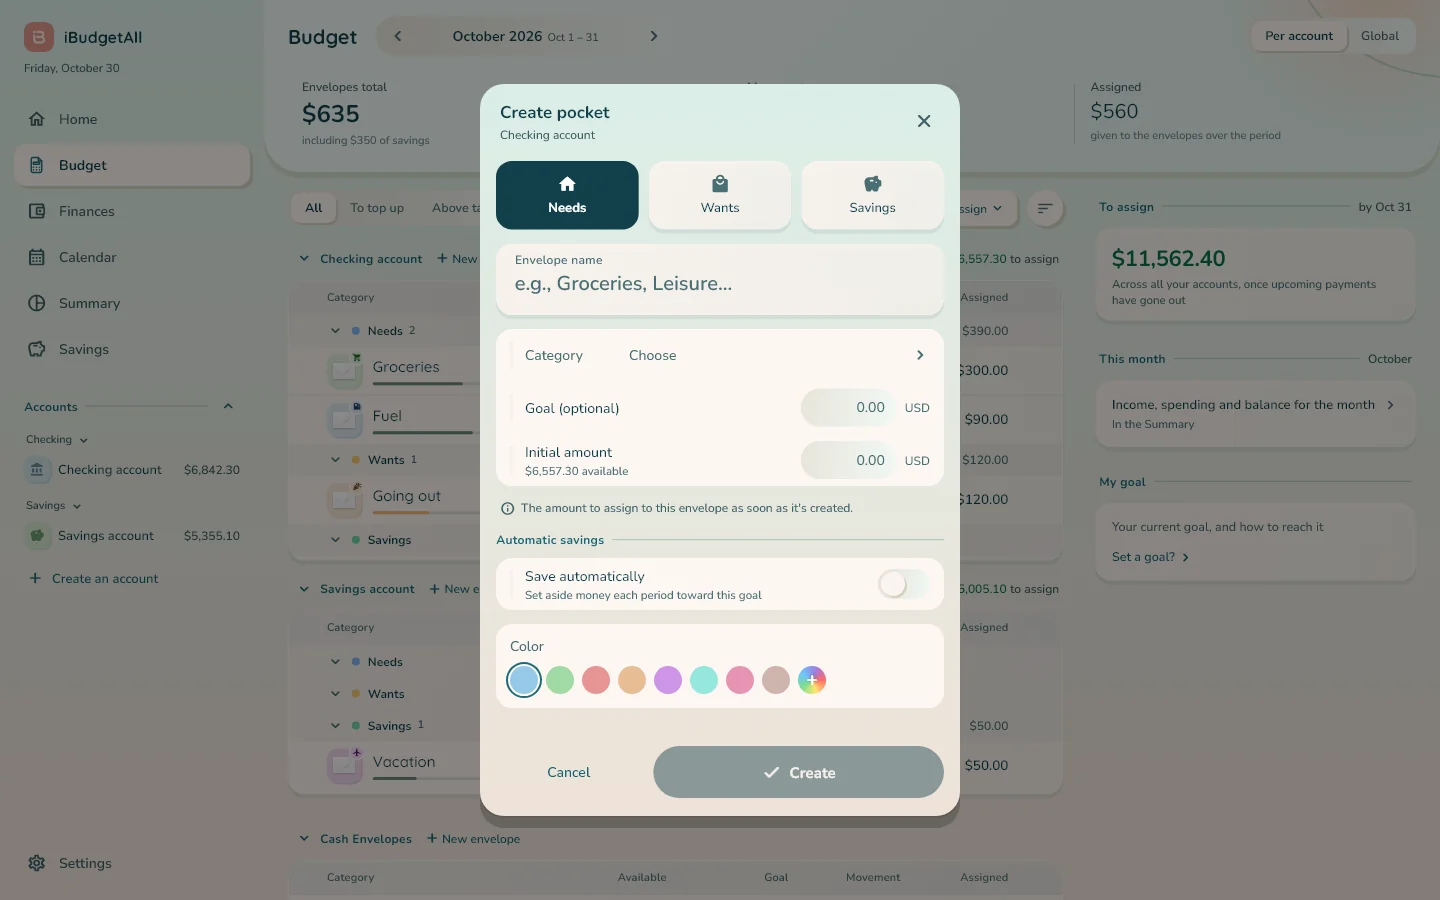
Creating an envelope. Click “New envelope”, next to “Auto-assign”, then, if you have several accounts, the envelope's account; the “New envelope” link right after an account's name goes straight to that account. As long as you have no envelopes, the “Create your first envelope” card does it too. The “Create pocket” window opens: choose the type (“Needs”, “Wants” or “Savings”), the “Envelope name” and the “Category”, then, if you wish, a “Goal (optional)”, an “Initial amount” and “Automatic savings”. Click “Create”.
Finances
“Finances” brings together everything that recurs each month: it's the phone's “My Finances”.
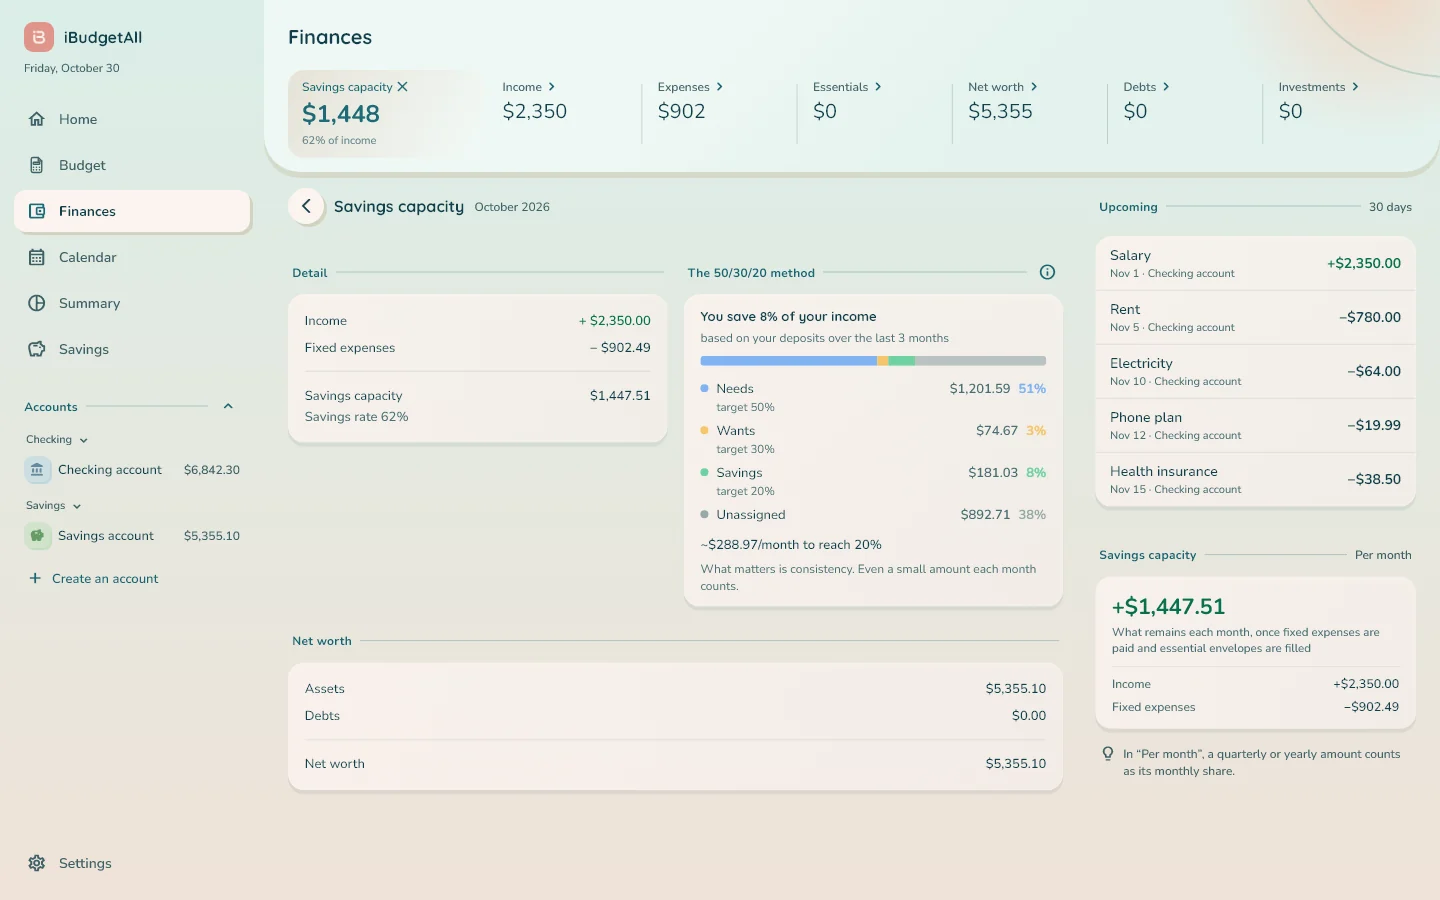
At the top, seven figures: “Savings capacity”, “Income”, “Expenses”, “Essentials”, “Net worth”, “Debts” and “Investments”. “Income” and “Expenses” filter the table; the others open their own view in place of the table, with a way to add items (“Add an asset”, “Add a debt”, “Add an investment”). The “Savings capacity” view breaks down the calculation, income minus fixed expenses minus essential envelopes, and shows where you stand with your 50/30/20 method.
Below, the table of your recurring rules, grouped into “Income”, “Fixed expenses”, “Transfers and automatic savings” and “Paused”, with the columns “Recurrence”, “Next”, “Account”, “Per month” and “Amount”. The filters “All”, “Income”, “Expenses” and “Paused” narrow down the rows. Hover over a row for “Edit rule” and “Pause”; click it to open its details on the right.
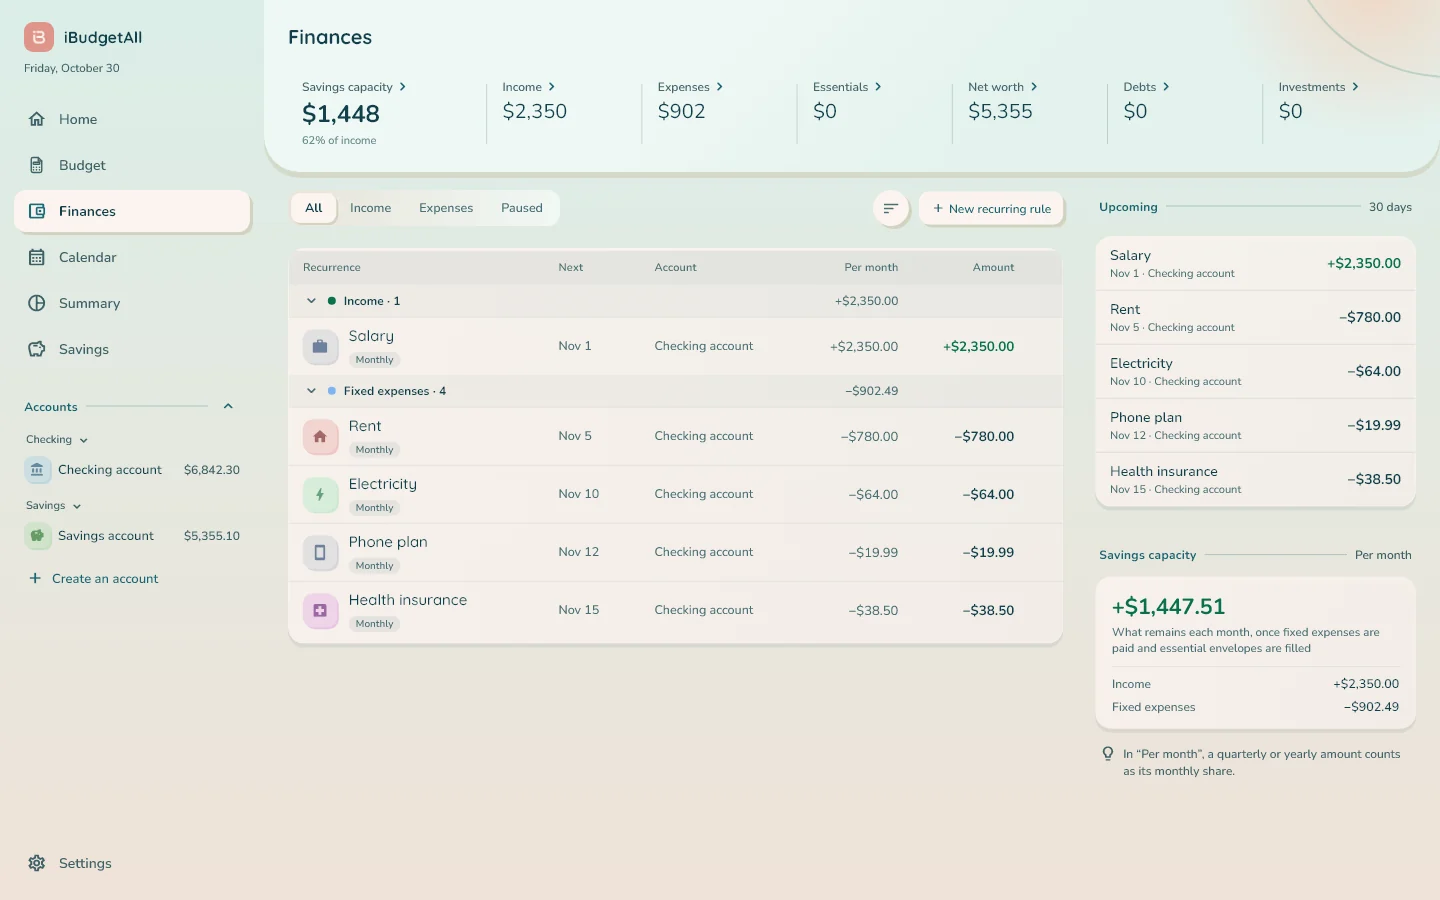
“New recurring rule” adds one: “Recurring income”, “Recurring expense”, “Recurring transfer” or “Recurring savings”. On the right, the “Upcoming” payments for the next 30 days and your “Savings capacity” for the month. A scheduled expense is recorded automatically on its date: don't enter it again.
An account
Click an account in the sidebar. Its page shows the “Current balance”, the “End of period”, “Income”, “Expenses” and the “Net for the period”.
Below, the “History” of its transactions, with “Search” and the filters “All”, “Income”, “Expenses” and “Transfers”, and what's “Upcoming”. On the right, “Balance over time” (hover over the curve to read a day's balance), the “Distribution” of your money across your accounts, and the account's envelopes.
At the top, “Expense”, “Income” and “Transfer” open the entry form for this account; the ⋮ menu offers actions for the account. Hover over a transaction: its ⋮ menu lets you edit or delete it; the menu of an upcoming payment also offers “Confirm today” and “Postpone”.
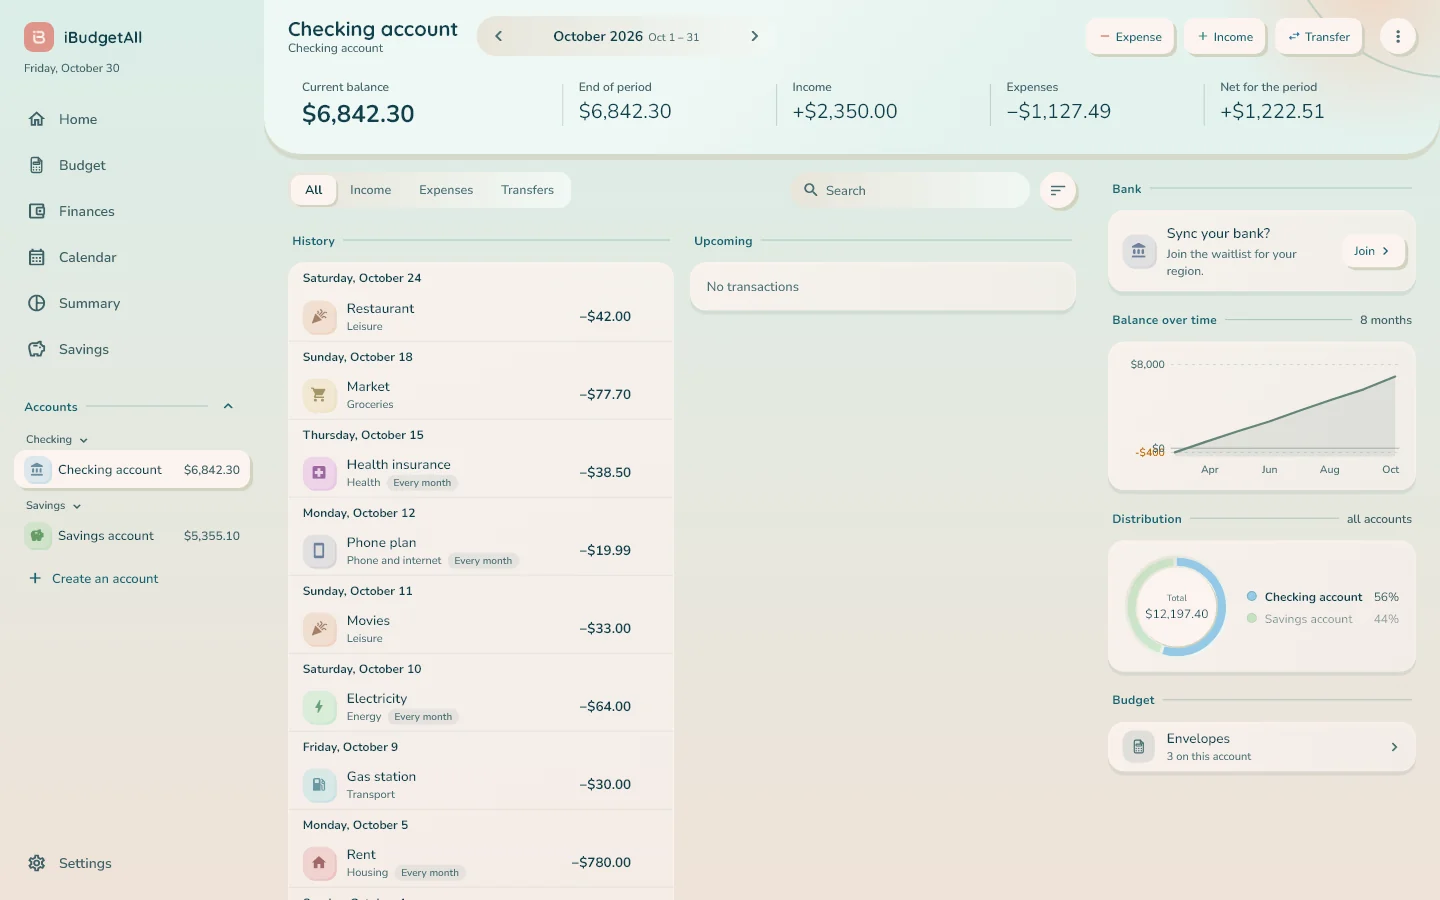
To correct an account's balance, or to understand the “End of period”, the explanations in the mobile guide apply here too.
Calendar
The “Calendar” shows your month day by day, with a single amount per cell: “money in minus money out”. Colored dots flag income, expenses and transfers.
Click a day: its transactions appear in the right column. The “Expense”, “Income” and “Transfer” buttons, at the top, add a transaction on the chosen day.
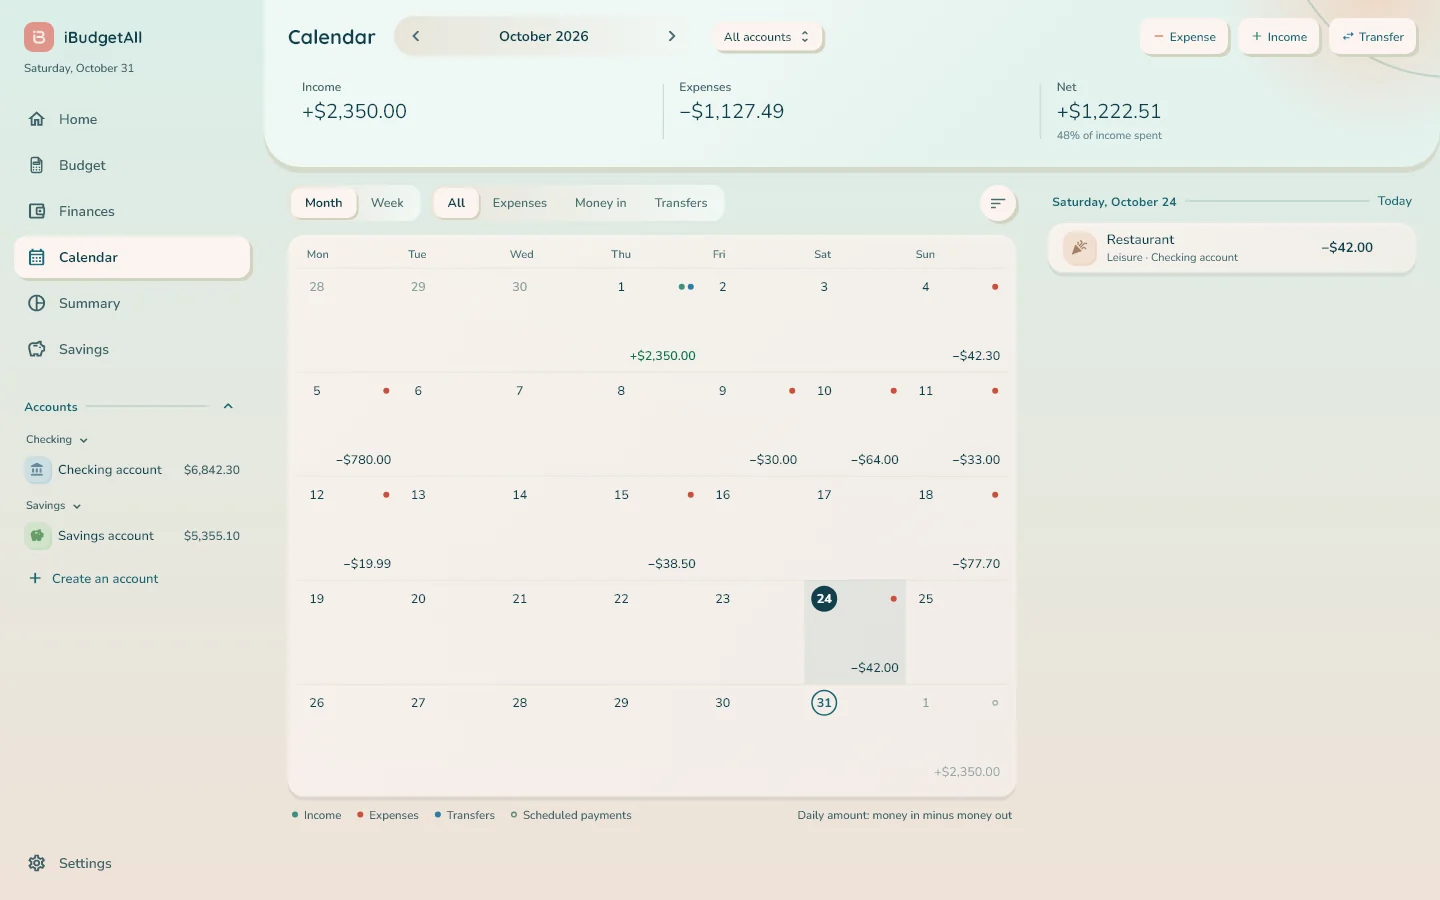
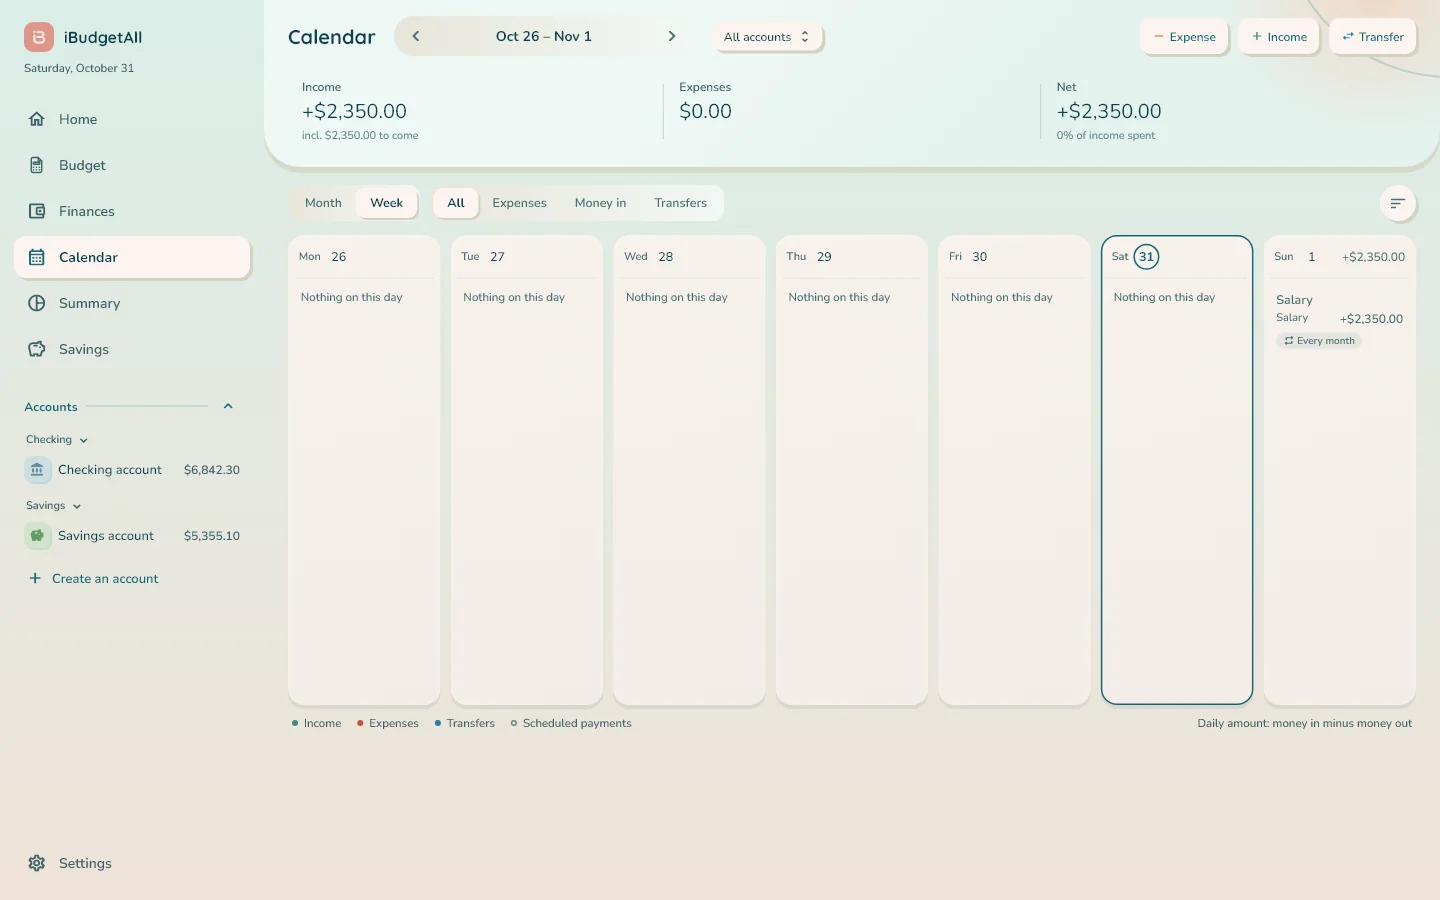
“Month” or “Week” changes the view; in week view, each column lists the day's transactions. The filters “All”, “Expenses”, “Money in” and “Transfers” narrow down what's shown, and the “All accounts” pill lets you pick an account: each cell then shows the end-of-day balance, in amber if it drops below zero. The round button, to the right of the filters, shows or hides the “Scheduled payments”.
Summary
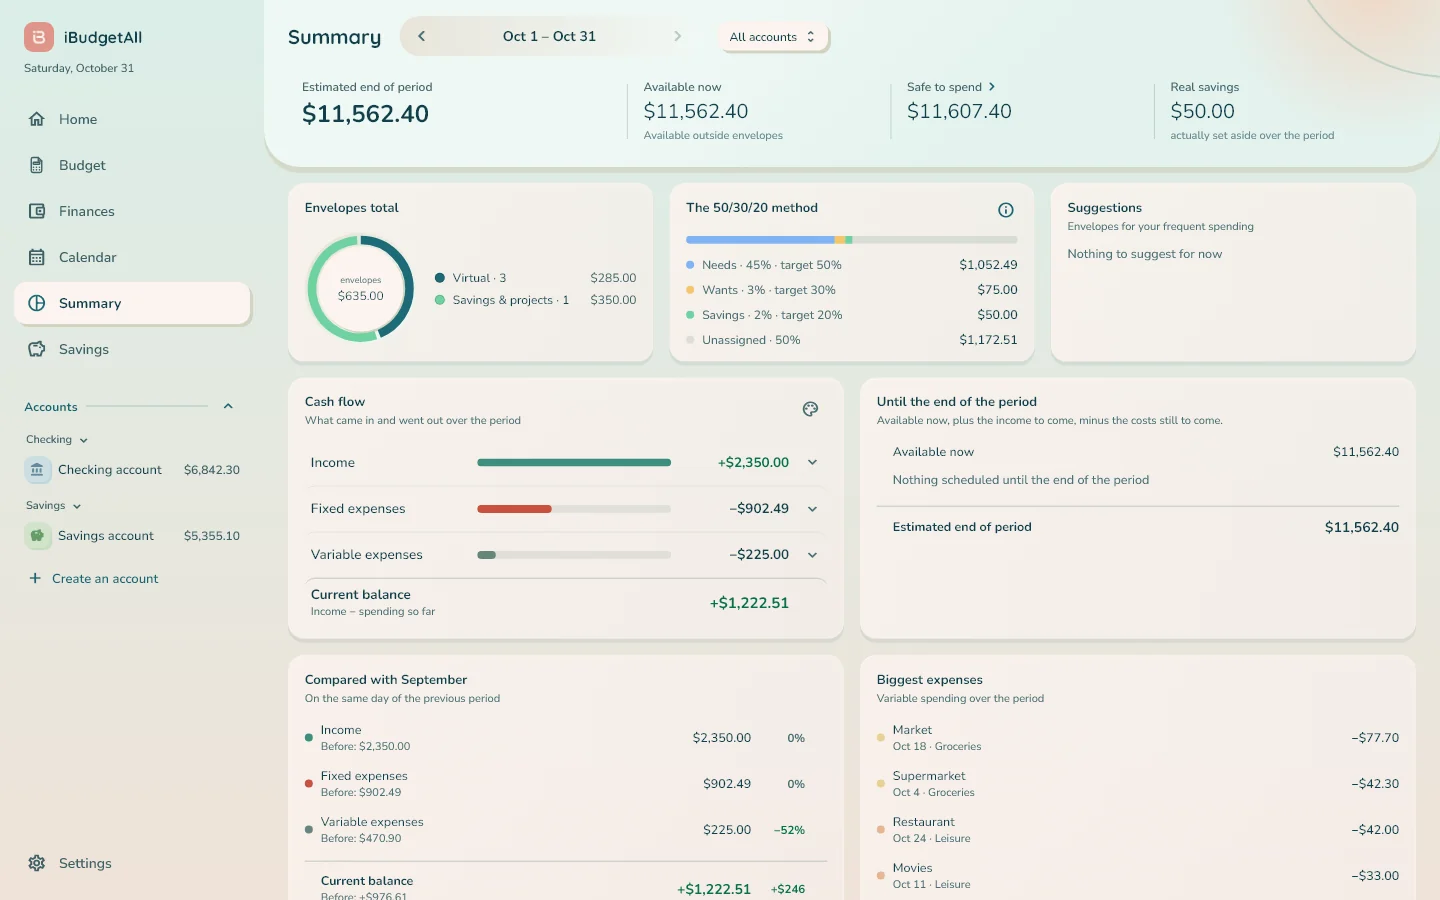
The “Summary” takes stock of the period: “Estimated end of period”, “Available now”, “Safe to spend” and “Real savings”.
Below, seven cards: the “Envelopes total”, “The 50/30/20 method” with each part's share and its target, some “Suggestions”, the “Cash flow” (income, fixed expenses, variable expenses, then the “Current balance” and the “Projected balance”), “Until the end of the period” (how the estimate is calculated), the comparison with the previous period and your “Biggest expenses”. Clicking a row opens its details.
Savings
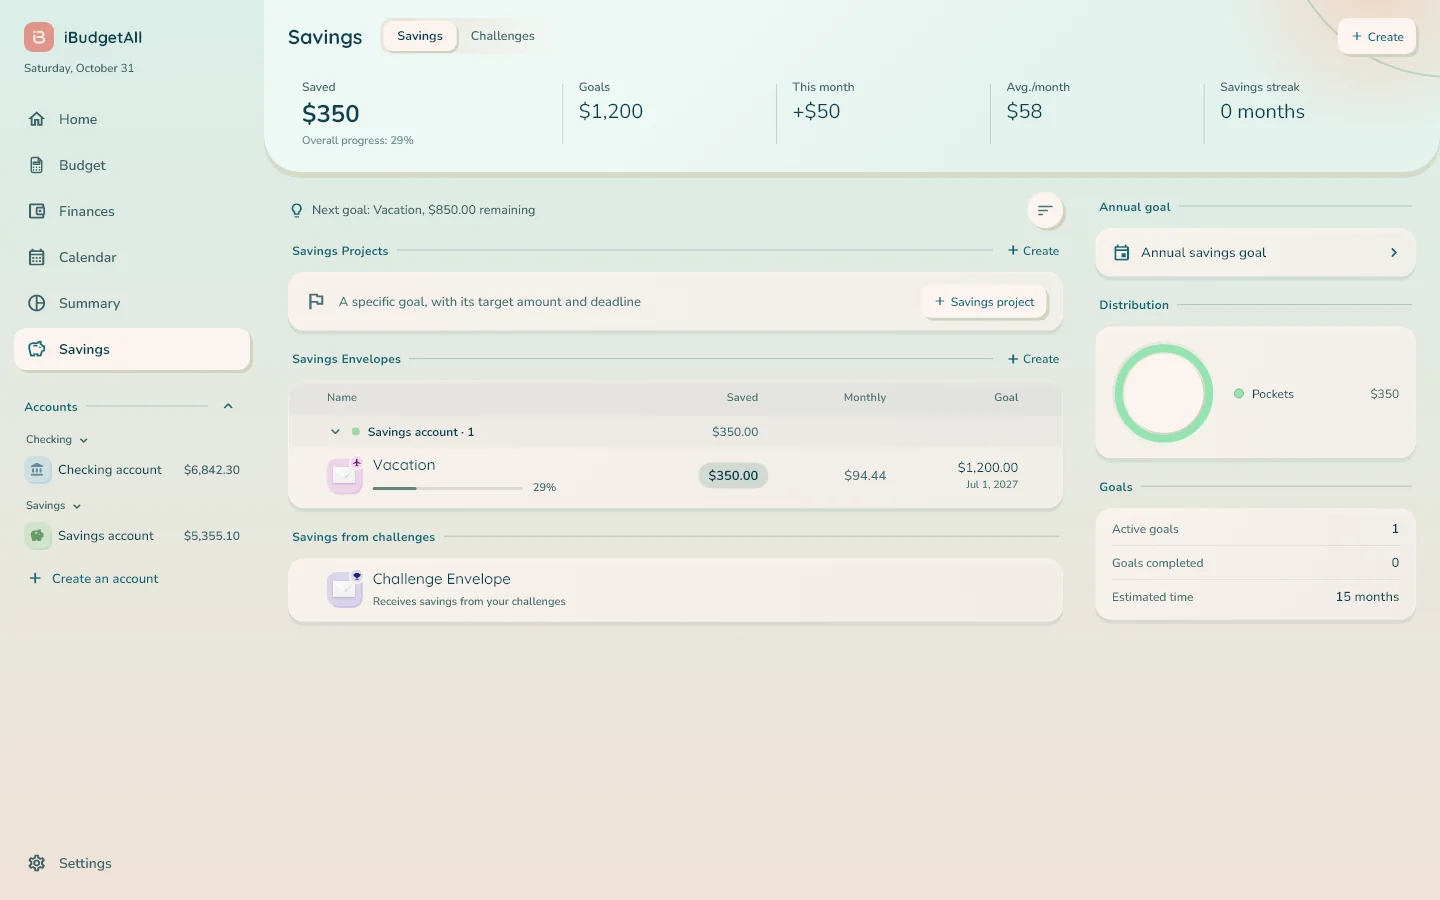
“Savings” brings together your savings envelopes and your projects: “Saved”, “Goals”, “This month”, “Avg./month” and “Savings streak” at the top.
The “Savings Envelopes” table has four columns: “Name”, “Saved”, “Monthly” (what you need to set aside each month to meet the deadline) and “Goal”. “Savings Projects” are created with “Savings project”, and the “Challenges” tab gathers your savings challenges.
Entering data without leaving the page
Every entry form opens in a window in the middle of the page: an expense, income, a transfer, an account, an envelope. When the transaction could involve several accounts, the window first asks you which one, for example “Select an account for this expense”.
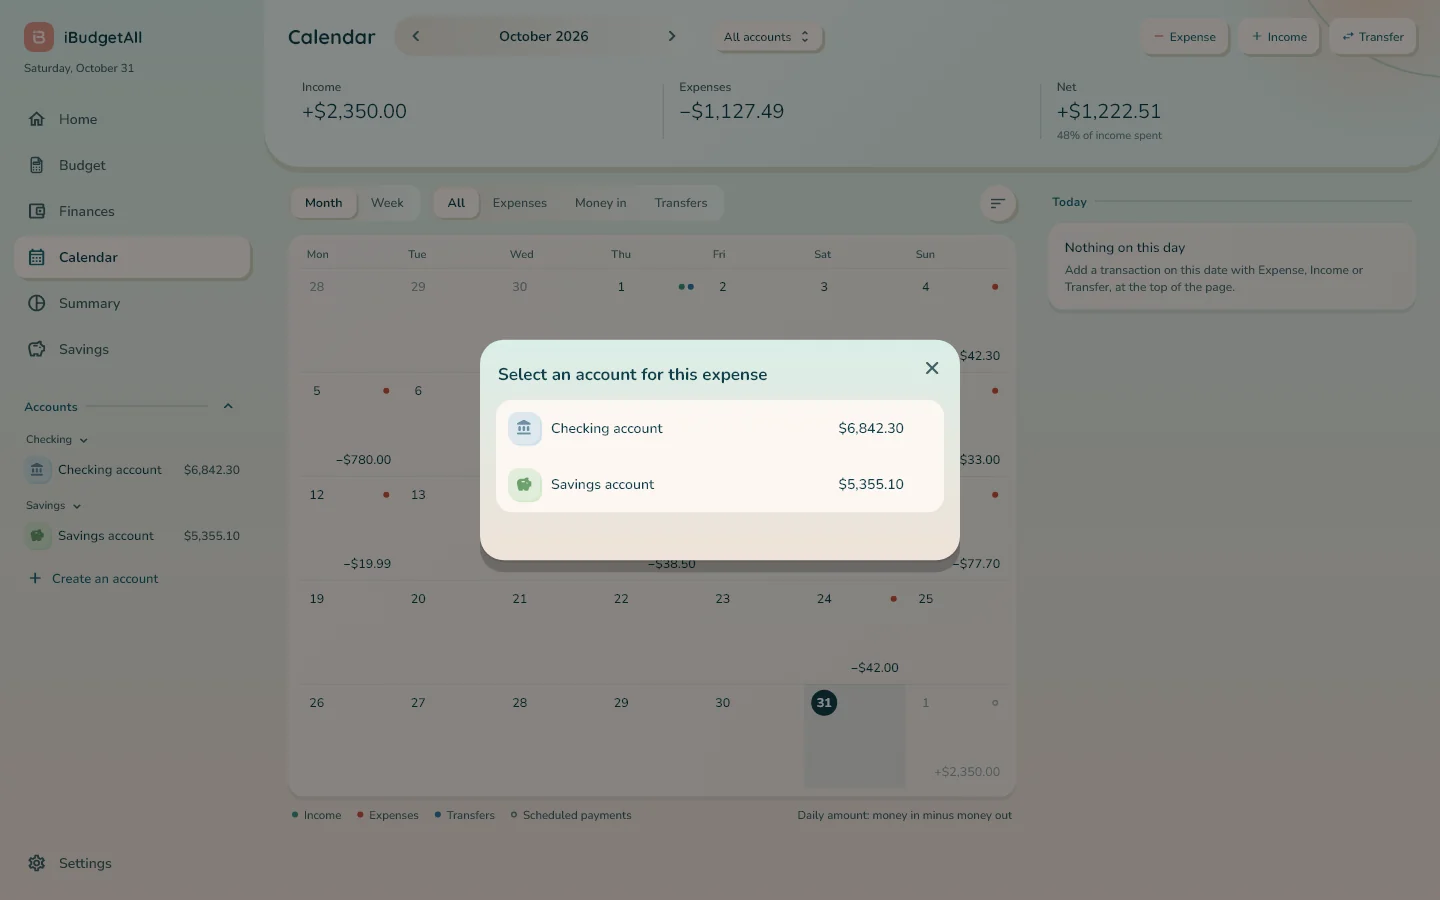
You open them from:
- the round “Income”, “Expenses” and “Transfers” buttons on “Home”;
- “Expense”, “Income” and “Transfer” at the top of the “Calendar” or of an account's page;
- hovering over an envelope in “Budget” (“Spend”, “Transfer”);
- “Create an account” in the sidebar, “New envelope” in “Budget” and “New recurring rule” in “Finances”.
“Cancel”, the X at the top right or the Esc key closes the window without saving anything; the Enter key activates its main button.
The rules of the mobile guide apply unchanged. A fixed expense is scheduled once: in the “New expense” window, choose “Fixed” at the top, or use “New recurring rule” in “Finances”, and the app will then record it on its date. A variable expense comes out of an envelope. A transfer between your own accounts is entered with “Transfer”.
Settings
“Settings”, at the bottom of the sidebar, turns the sidebar into the settings menu: “My budget”, “App”, “Appearance”, “Help”, “My data”, “About”, “Subscription” and “Account”. The round arrow at the top takes you back to the page you came from. The page has two columns: the list of settings, then their details on the right.
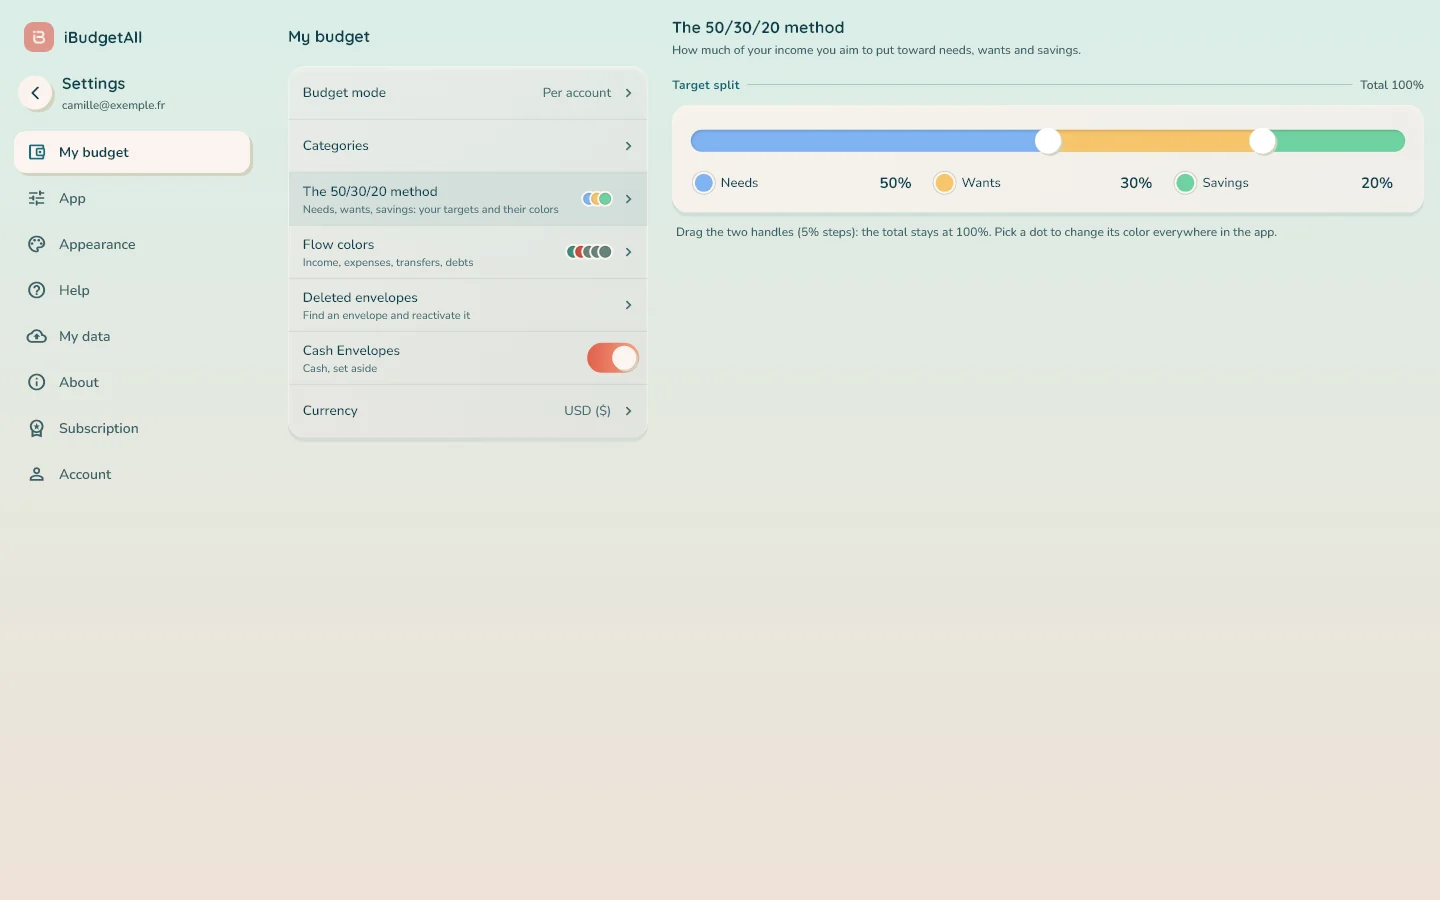
The 50/30/20 method, your way. In “My budget”, the row “The 50/30/20 method” opens the split you're aiming for between your needs, your wants and your savings. Drag the bar's two handles: they move in steps of 5%, and the total stays at 100%. Click a color dot to change that part's color, everywhere in the app.
The row takes the name of your targets, for example “The 60/30/10 method”. “Back to 50/30/20” restores the original split. The setting is saved to your account: your phone uses it too.
Flow colors. Just below, “Flow colors” lets you choose the color of your income, fixed expenses, variable expenses, transfers and debts, in the “Summary” and the charts. “Original colors” brings back the default ones.
The trial and the subscription
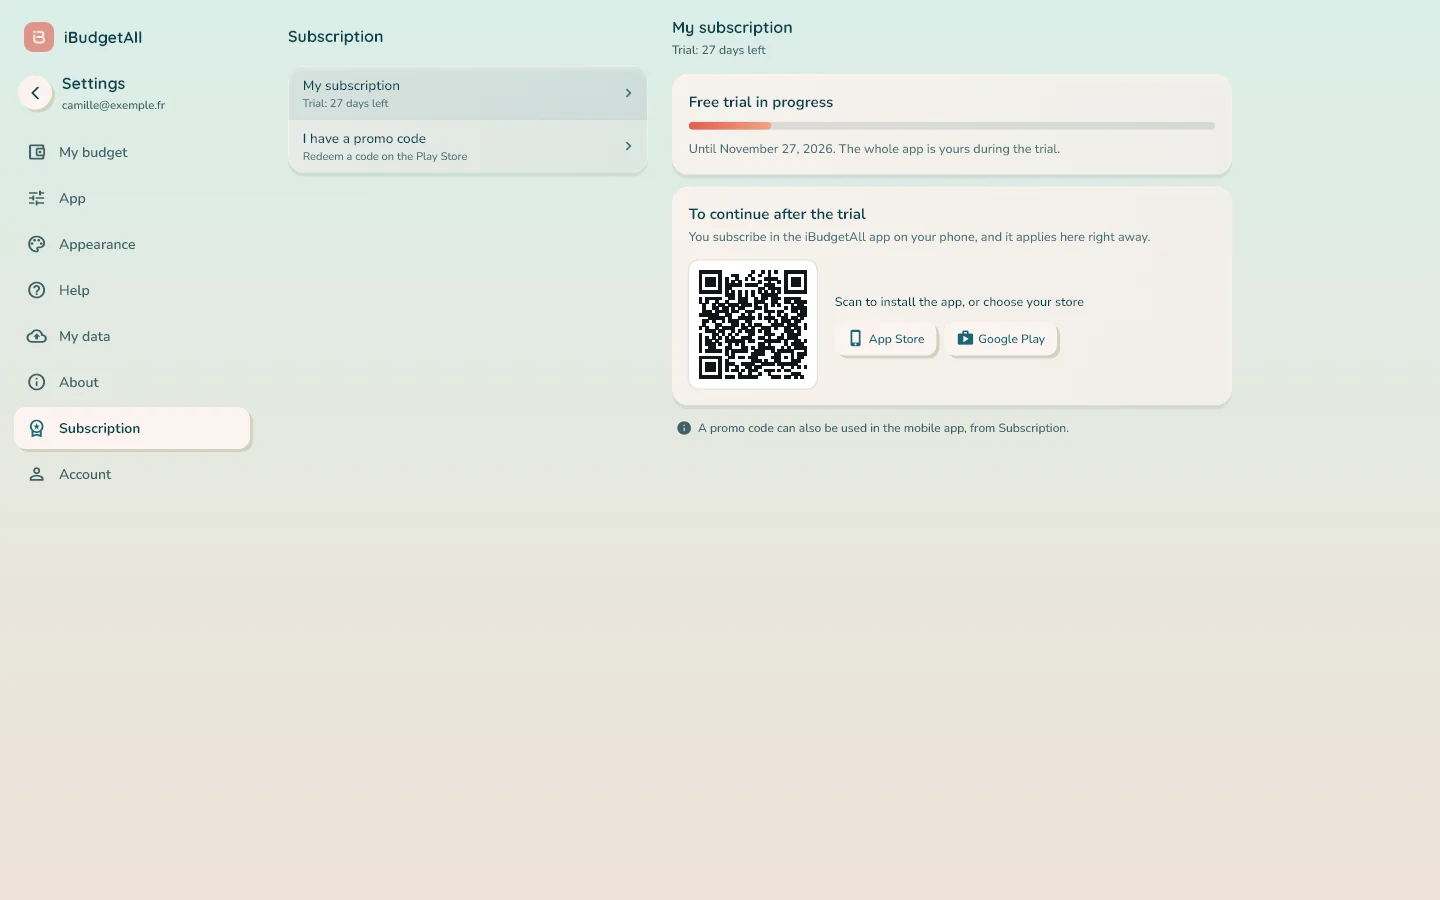
The trial. An account created on a computer gets the 32-day trial from its first sign-in, just like on the phone, with no credit card required. During the trial, the whole app is yours. The banner at the top of “Home” shows the days left and the end date, for example: “Your trial ends on November 23, 2026. To continue afterwards, you subscribe in the mobile app.”
You subscribe on your phone. No purchase is possible in the browser. “My subscription”, in the banner or in “Settings”, “Subscription” section, explains what to do: “You subscribe in the iBudgetAll app on your phone, and it applies here right away.”
A QR code lets you install the app; “App Store” and “Google Play” lead to the two stores.
During the trial, the page shows “Free trial in progress” and its end date, then what to do under “To continue after the trial”. After that, if you're already subscribed on your phone, “Access opens here on its own within a few seconds.” If not, click “Check now”. A promo code is also redeemed in the mobile app.
The desktop getting started guide
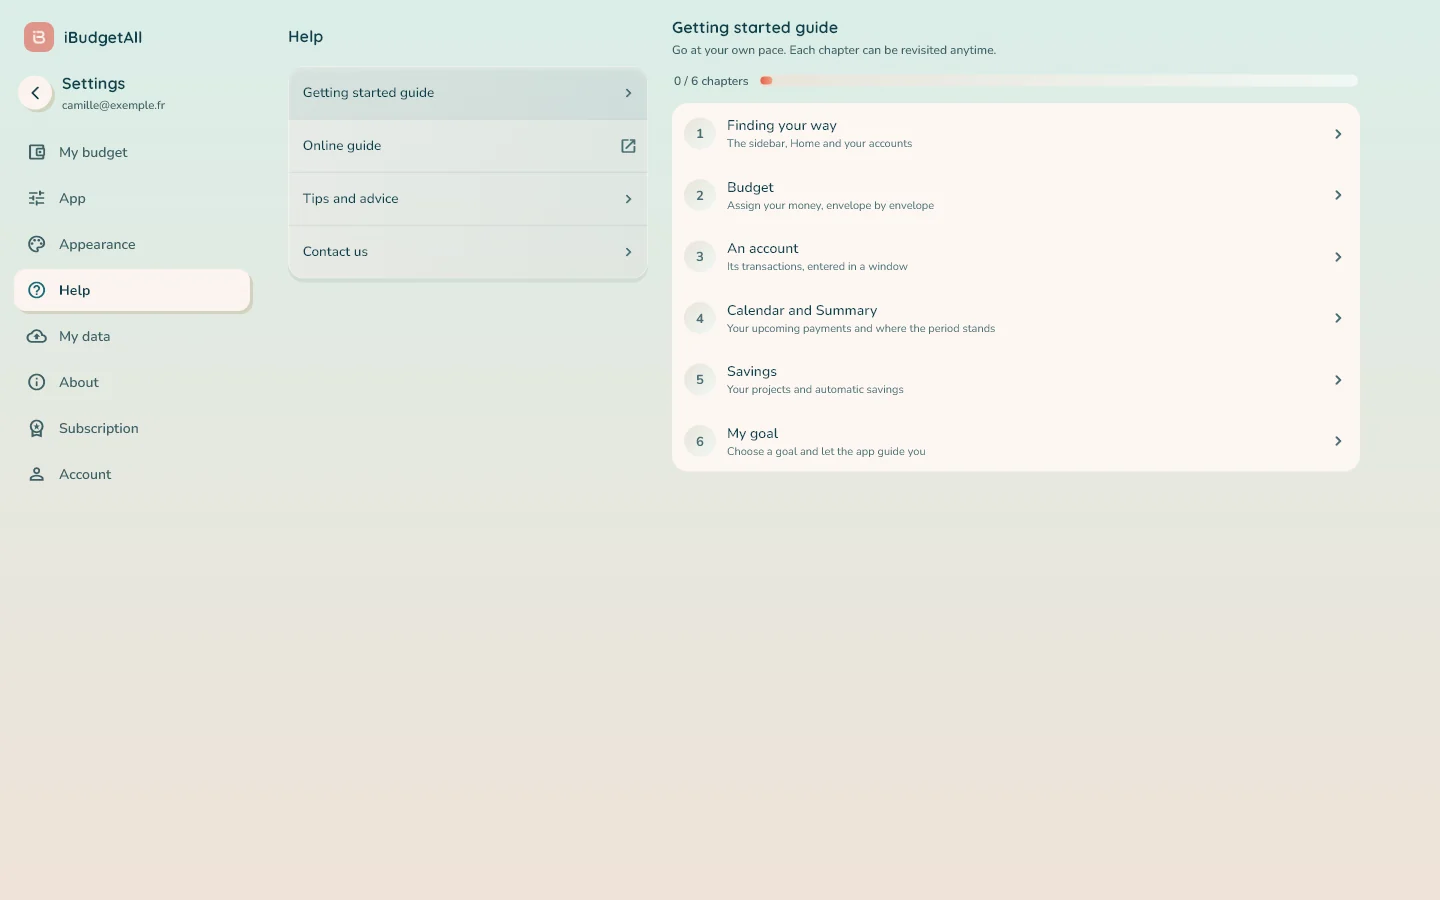
In “Settings”, “Help” section, the “Getting started guide” row offers a guided tour of the desktop version: bubbles that show, on your own pages, where everything is. It has six chapters, to follow in order or one at a time:
- “Finding your way”;
- “Budget”;
- “An account”;
- “Calendar and Summary”;
- “Savings”;
- “My goal”.
The same section also offers “Tips and advice”, the “Online guide” (this page), “Videos” and “Contact us”.
Pitfalls to avoid
- A different sign-in method from the one on your phone. You may not find your account. Use the same method: email, Google or Apple.
- Looking for a file to download. There isn't one: the desktop version installs from the browser, or works in a tab.
- A window that's too narrow. Below 900 pixels wide, the app uses the phone layout. Widen the window.
- An “Initial balance” left at zero. Enter your bank's real balance, or all your numbers will be off.
- Turning down reminders without thinking. At the end of setup, “Turn on” lets you receive them on this computer; otherwise, they only arrive on your phone.
- Looking for where to pay for the subscription. You subscribe in the mobile app; it then applies here on its own.
- Switching modes by mistake. “Per account” and “Global”, at the top of “Budget”, change your budget mode: read the confirmation window before you confirm.
Frequently asked questions
Do I need to install anything?
Is my data the same as on my phone?
Why can't I pay for the subscription here?
Will I get notifications on my computer?
Why does the page look like the phone version?
What is the “Audience measurement” card for, and where do I change my choice?
Where are the statistics?
Where are my income and fixed expenses?
Can I change the 50/30/20 method?
Going further
- The guide “Getting started with iBudgetAll”. The envelope method, the preparation and the six steps on the phone: everything it explains also applies on a computer. Read the guide
- The desktop video guide. Ten chapters, from signing in to your forecasts: jump straight to the one you need. Watch the video
- The guided tour. “Settings”, “Help” section, “Getting started guide” row.
- “Tips and advice”. Short articles on the method, in the same “Help” section.
A big screen to plan, a phone to keep track: your budget is the same everywhere.
Your budget, on the big screen too
Same account, same data, on your computer and on your phone. 32-day trial with no card.